AI エージェントをデータベースと API に接続する
Squid に API を接続して、データベースに書き込んで持ち物リストを作成するエージェントを構築する
作成するもの
- 入力した郵便番号(zip code)と旅行日程に基づいて、休暇に持っていくアイテムのリストを作成するフルスタックアプリ。
- アプリは外部 API を使って予測天気を確認し、天気に基づいて持ち物リストを作成し、これらのアイテムをデータベースに書き込みます。
このチュートリアルでは、次の機能を使用します:
| AI Abilities | Internal Connectors | External Connectors | Backend Functions |
|---|---|---|---|
| AI Functions | Built-in Database | HTTP API | Executables, Triggers |
このアプリケーションは WeatherAPI.com と連携して、 指定した場所と日付の予報を取得し、その情報を AI agent に渡します。AI agent は AI function を使用して、提案された持ち物アイテムを Squid の built-in database に書き込みます。
さらにこの機能は、Real-time Product Search API を使って拡張され、提案アイテムを Google Shopping で購入するためのリンクを提供します。これにより、Squid を使って AI 機能と複数サービスを簡単に統合できることを示します。

学べること
- Squid AI を使用して AI agent を作成する方法。
- agent に functions を追加する方法。
TypeScript の経験が必要です。React の経験があると便利ですが、必須ではありません。
環境セットアップ
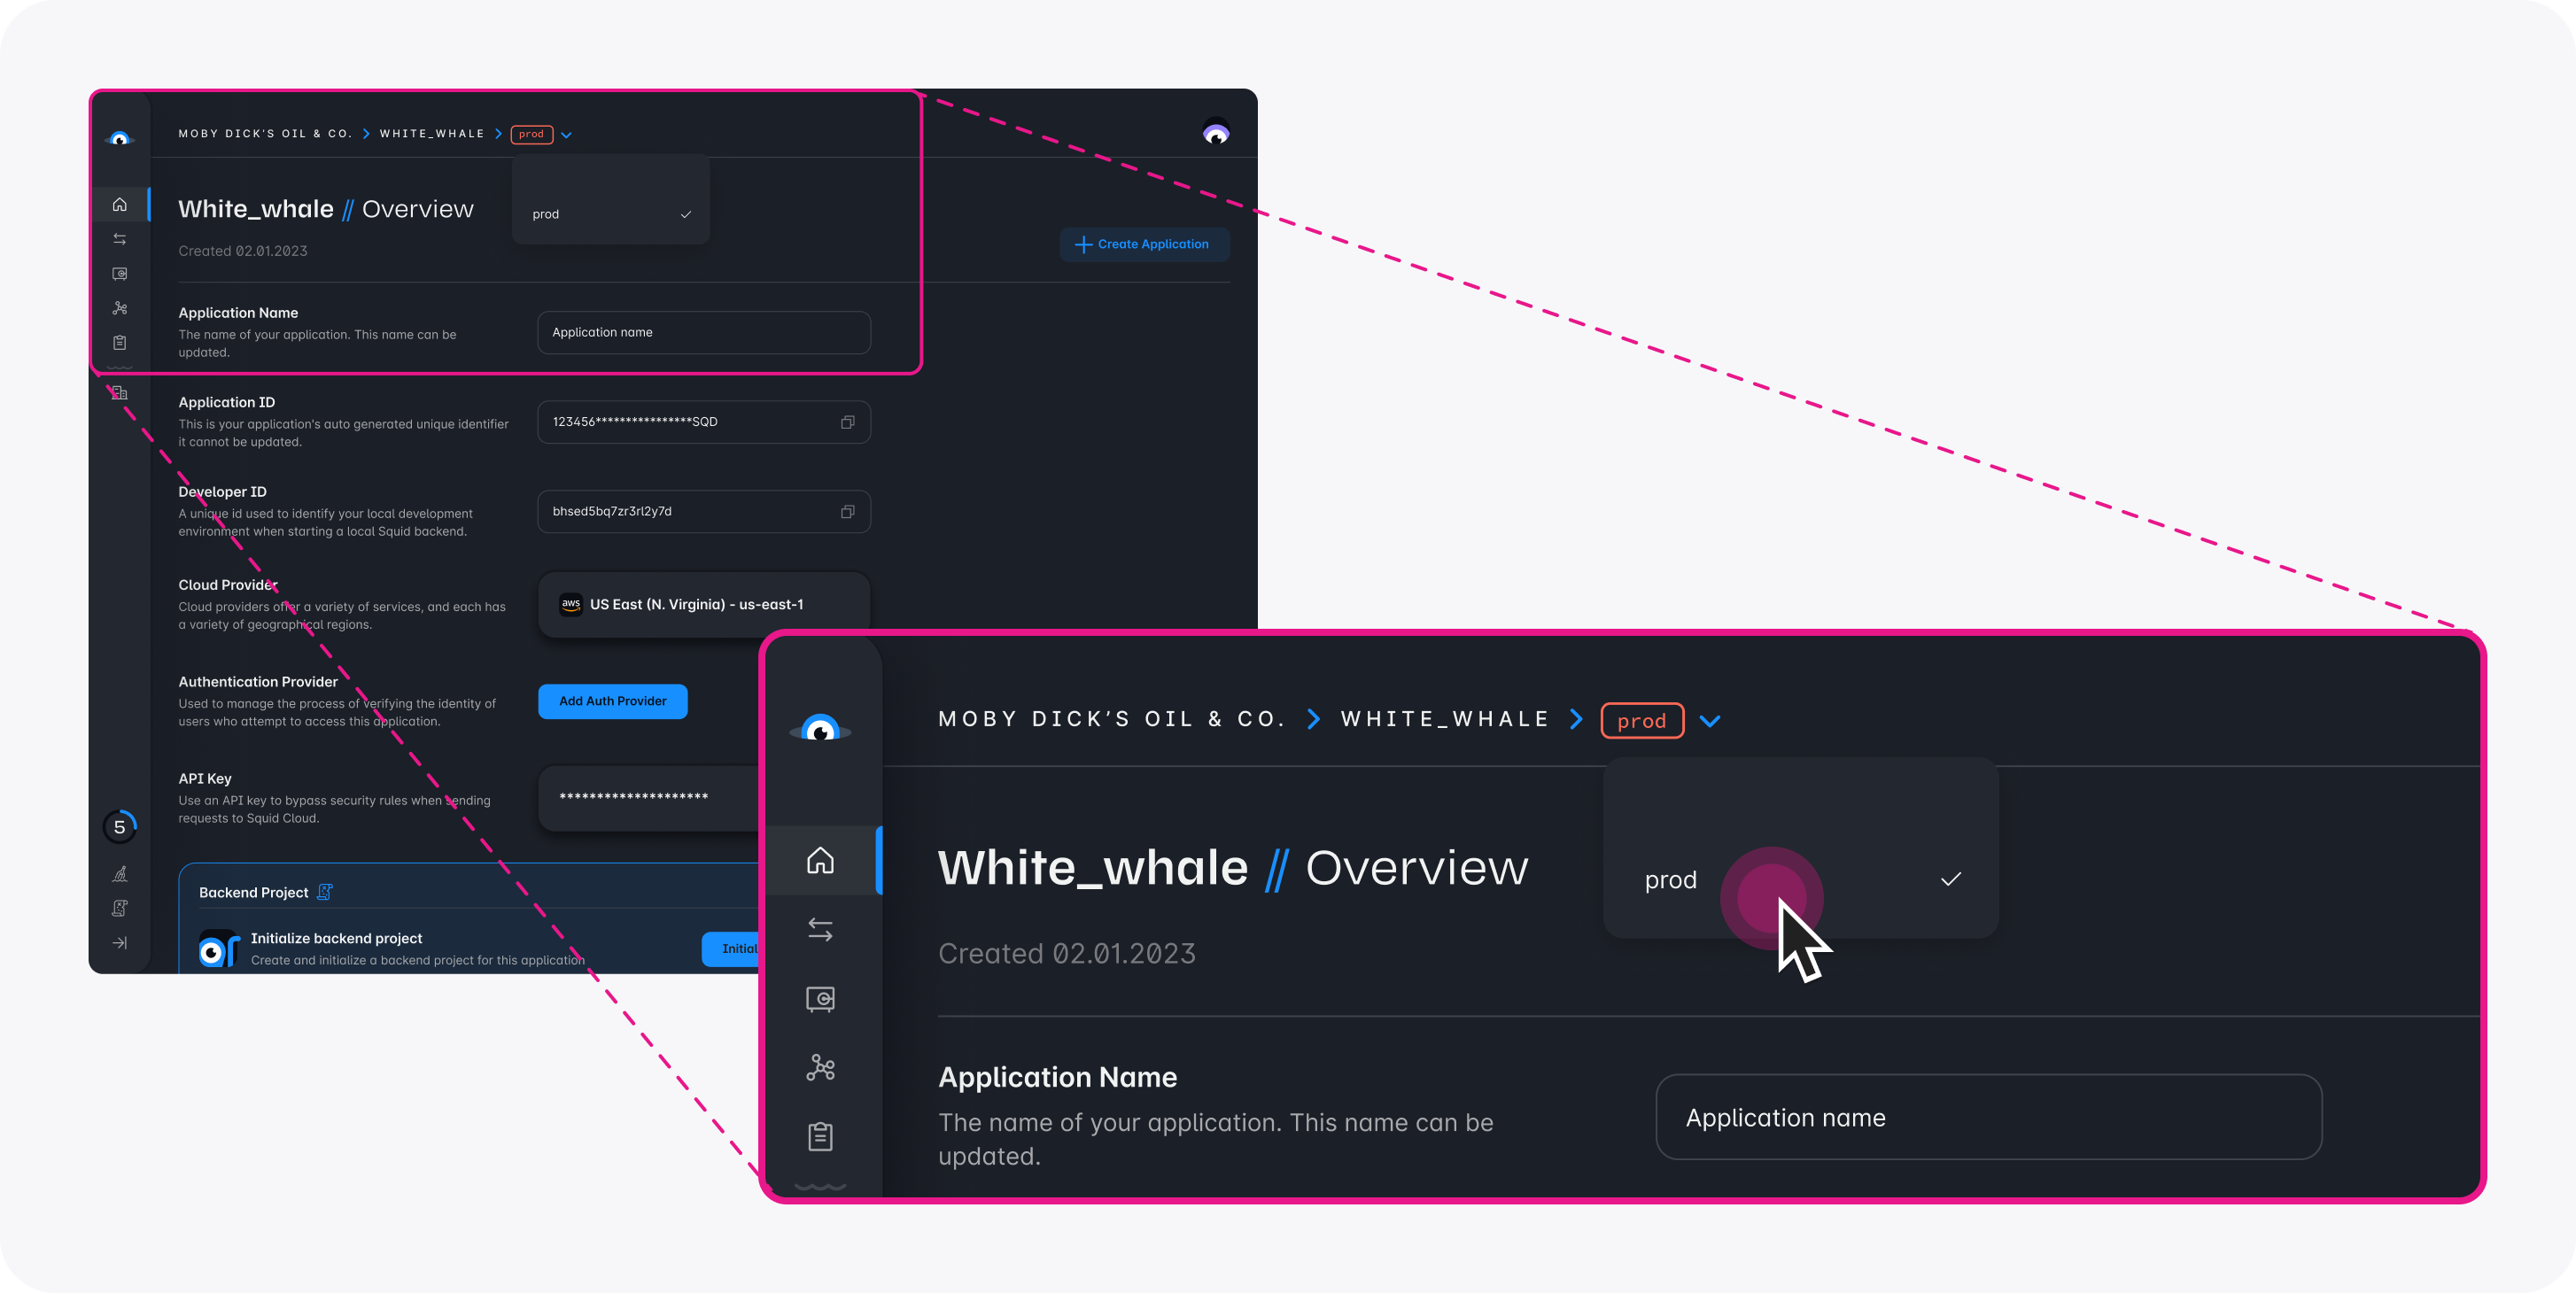
- In the Squid Console, switch to the
devenvironment.
Download the squid-ai-vacation code sample using the following command. Replace the placeholders with the values from your Squid application as shown in the console.
npx @squidcloud/cli init-sample squid-ai-vacation --template squid-ai-vacation --appId YOUR_SQUID_APP_ID --apiKey YOUR_SQUID_API_KEY --environmentId dev --squidDeveloperId YOUR_SQUID_DEVELOPER_ID --region YOUR_REGION
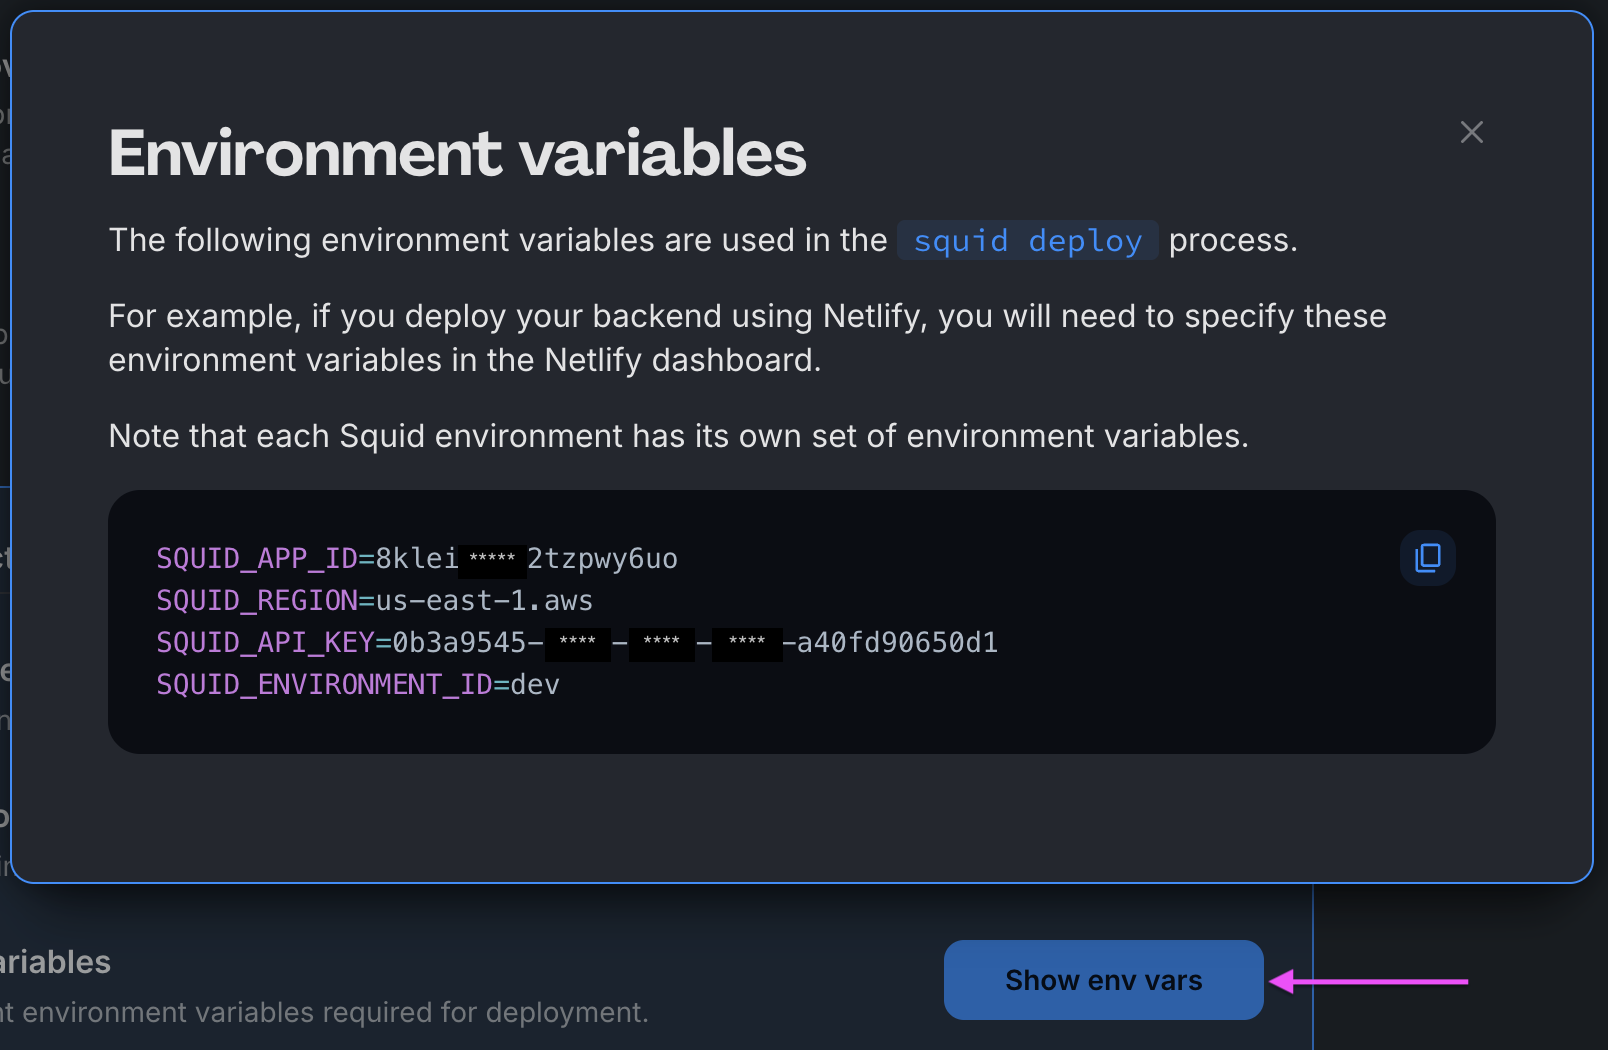
You can find your environment variables under: 'Application' -> 'Show env vars' as seen below:
- Open the project in the IDE of your choice.
- Start the app locally by running the following command in the project folder:
npm run start
- To view the app, navigate to localhost:PORT, where PORT is logged in the terminal. The address will likely be
http://localhost:5173.
WeatherAPI.com アカウントを作成する
天気予報を取得するため、このアプリケーションは WeatherAPI.com が提供する API を使用します。この API には無料トライアルがあるため、このサンプルを無料で利用できます。
-
WeatherAPI.com の無料トライアルに登録します。
-
WeatherAPI.com のダッシュボードで WeatherAPI.com API key を確認できます。後の手順で API connector を使用するために必要になるので、この API key を控えておいてください。
WeatherAPI.com を接続する
Squid で API を接続する場合、多くは Squid Console で HTTP API connector を追加しますが、このチュートリアルでは必須ではありません。詳しくは、HTTP API connectors のドキュメント を参照してください。
-
このアプリケーションでは、cURL コマンドを使用して Weather API connector を生成できます。ターミナルウィンドウで次のコマンドを実行し、
YOUR_SQUID_APP_IDとYOUR_SQUID_API_KEYのプレースホルダーを Squid app の値に置き換えてください。正しい値は、Squid Console のアプリケーション概要ページにある Backend Project セクション、または.envファイルで確認できます。このコマンドを実行すると、Squid application に weather という名前の新しい API connector が追加されます。
curl -X PUT https://console.us-east-1.aws.squid.cloud/openapi/iac/applications/YOUR_SQUID_APP_ID-dev/integrations/weather -H "x-app-api-key: YOUR_SQUID_API_KEY" -H "Content-Type: application/json" -d '{
  "id": "weather",
  "configuration": {
    "discoveryOptions": {}
  },
  "type": "api"
}'
-
次の cURL コマンドを実行して API schema を取り込みます。
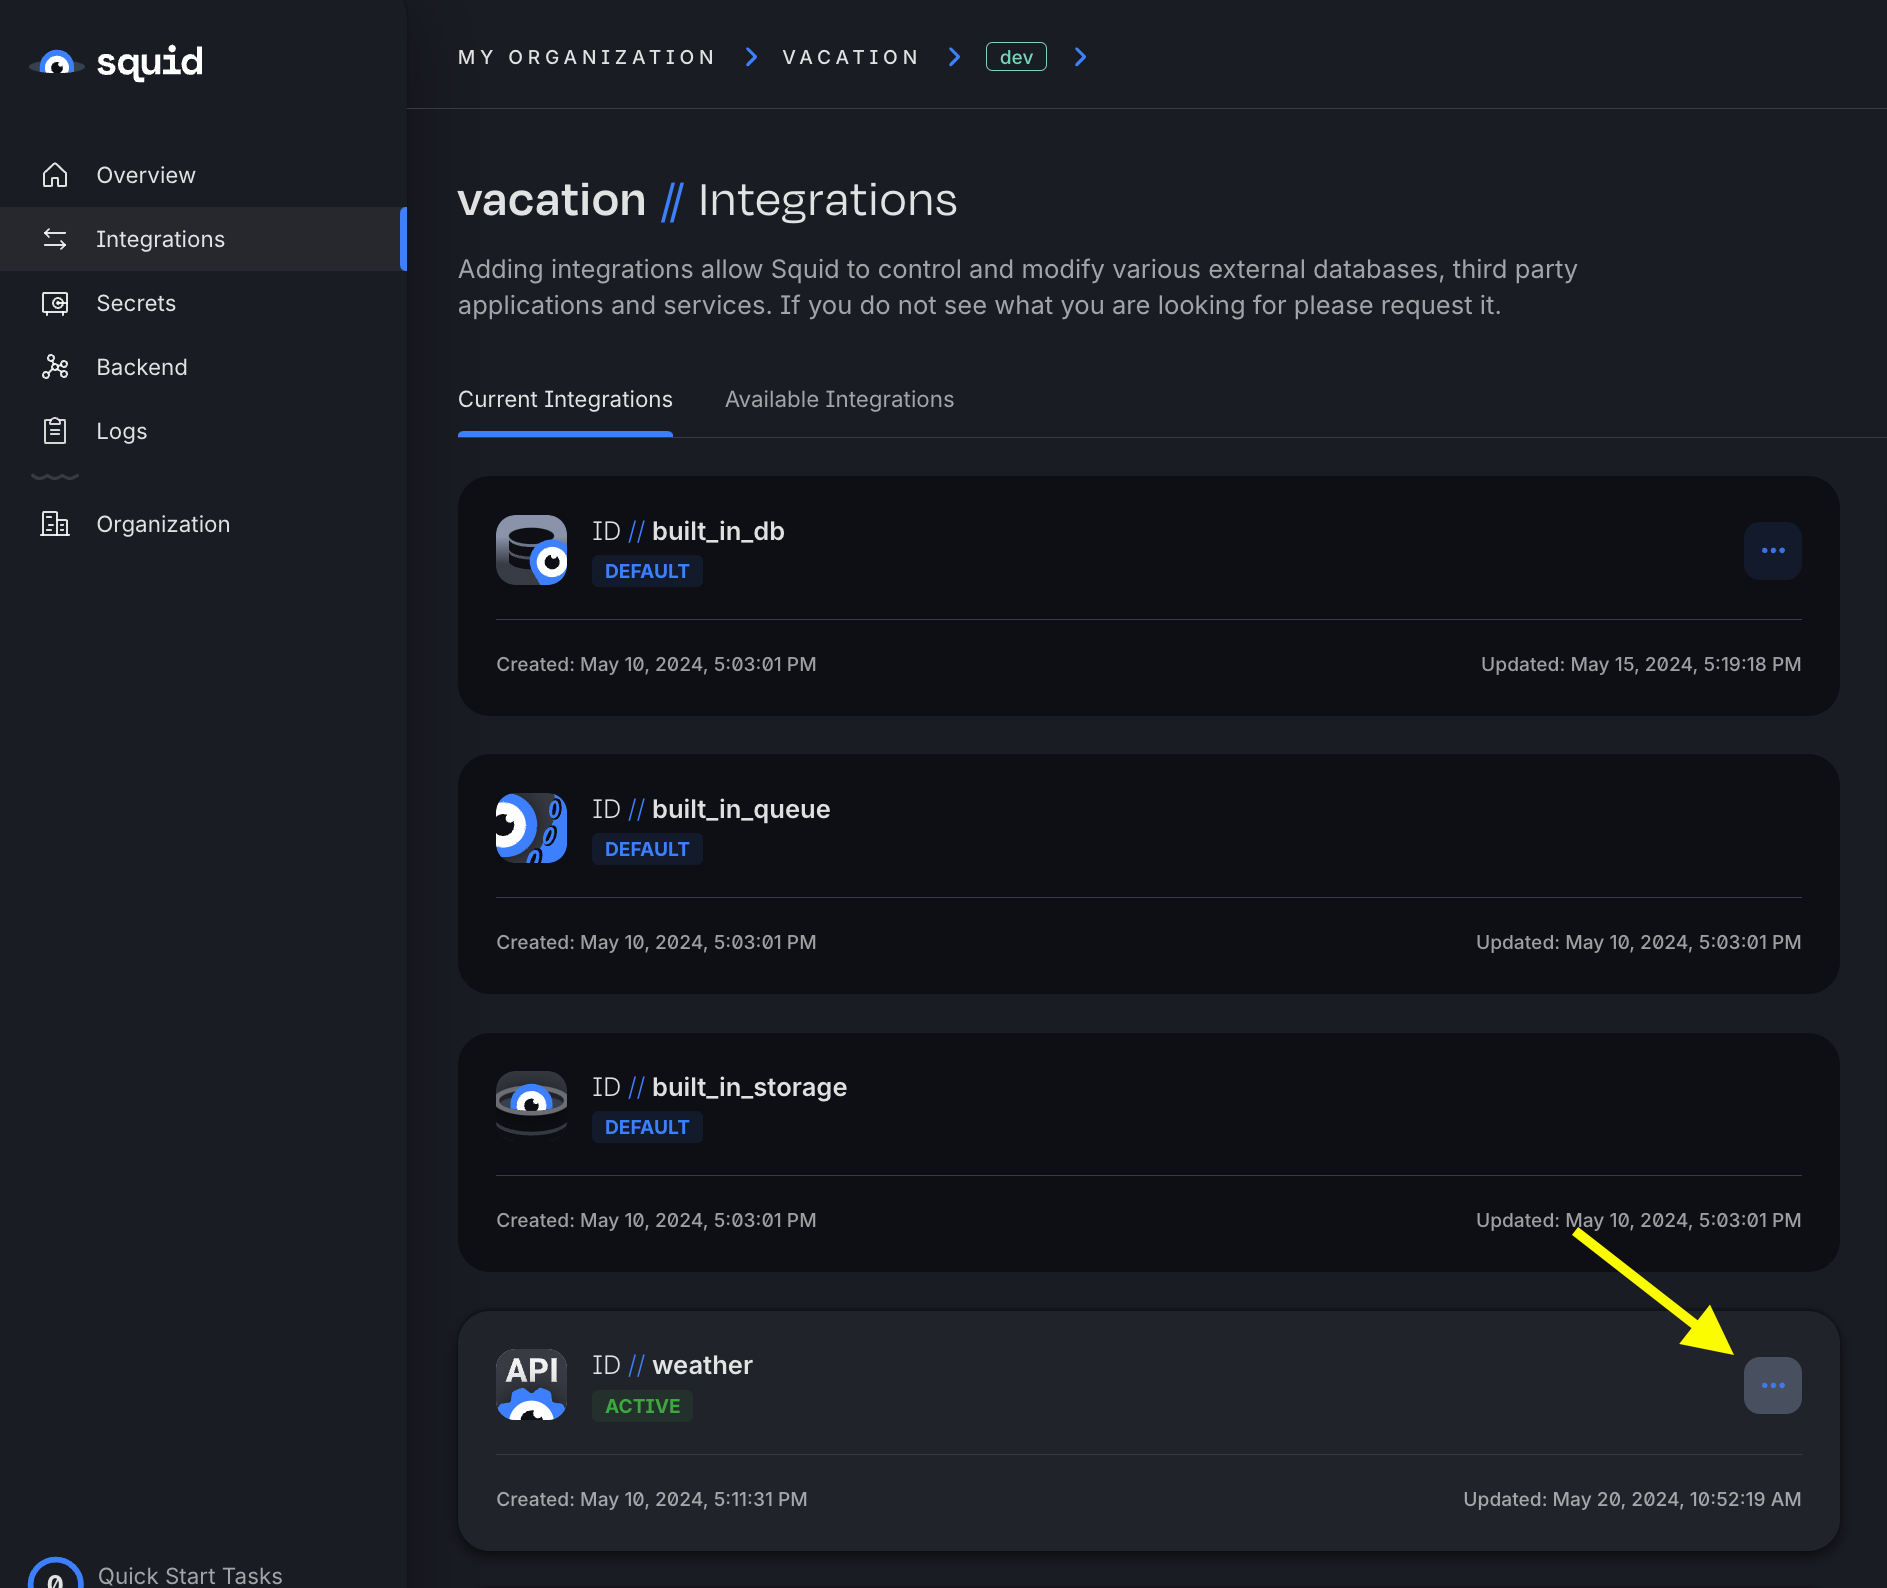
YOUR_SQUID_APP_IDとYOUR_SQUID_API_KEYのプレースホルダーを Squid app の値に置き換えてください。API schema を検出(discover)することで、API connector をよりスムーズに利用できます。このコマンドを実行した後、Squid Console で weather connector に移動し、
...ボタンをクリックして Schema を選択すると、schema を確認できます。
curl -X PUT https://console.us-east-1.aws.squid.cloud/openapi/iac/applications/YOUR_SQUID_APP_ID-dev/integrations/weather/schema -H "x-app-api-key: YOUR_SQUID_API_KEY" -H "Content-Type: application/json" -d '{
  "type": "api",
  "baseUrl": "https://api.weatherapi.com/v1",
  "endpoints": {
    "realtime-weather": {
      "relativePath": "/current.json",
      "method": "get",
      "requestSchema": {
        "q": {
          "location": "query",
          "description": null
        },
        "lang": {
          "location": "query",
          "description": null
        }
      },
      "responseSchema": {},
      "injectionSchema": null,
      "tags": null
    },
    "forecast-weather": {
      "relativePath": "/forecast.json",
      "method": "get",
      "requestSchema": {
        "q": {
          "location": "query",
          "description": null
        },
        "days": {
          "location": "query",
          "description": null
        },
        "dt": {
          "location": "query",
          "description": null
        },
        "unixdt": {
          "location": "query",
          "description": null
        },
        "hour": {
          "location": "query",
          "description": null
        },
        "lang": {
          "location": "query",
          "description": null
        },
        "alerts": {
          "location": "query",
          "description": null
        },
        "aqi": {
          "location": "query",
          "description": null
        },
        "tp": {
          "location": "query",
          "description": null
        }
      },
      "responseSchema": {},
      "injectionSchema": null,
      "tags": null
    },
    "future-weather": {
      "relativePath": "/future.json",
      "method": "get",
      "requestSchema": {
        "q": {
          "location": "query",
          "description": null
        },
        "dt": {
          "location": "query",
          "description": null
        },
        "lang": {
          "location": "query",
          "description": null
        }
      },
      "responseSchema": {
        "location": {
          "location": "body",
          "path": "location",
          "description": null
        },
        "forecast": {
          "location": "body",
          "path": "forecast",
          "description": null
        }
      },
      "injectionSchema": null,
      "tags": null
    },
    "history-weather": {
      "relativePath": "/history.json",
      "method": "get",
      "requestSchema": {
        "q": {
          "location": "query",
          "description": null
        },
        "dt": {
          "location": "query",
          "description": null
        },
        "unixdt": {
          "location": "query",
          "description": null
        },
        "end_dt": {
          "location": "query",
          "description": null
        },
        "unixend_dt": {
          "location": "query",
          "description": null
        },
        "hour": {
          "location": "query",
          "description": null
        },
        "lang": {
          "location": "query",
          "description": null
        }
      },
      "responseSchema": {},
      "injectionSchema": null,
      "tags": null
    },
    "marine-weather": {
      "relativePath": "/marine.json",
      "method": "get",
      "requestSchema": {
        "q": {
          "location": "query",
          "description": null
        },
        "days": {
          "location": "query",
          "description": null
        },
        "dt": {
          "location": "query",
          "description": null
        },
        "unixdt": {
          "location": "query",
          "description": null
        },
        "hour": {
          "location": "query",
          "description": null
        },
        "lang": {
          "location": "query",
          "description": null
        }
      },
      "responseSchema": {},
      "injectionSchema": null,
      "tags": null
    },
    "search-autocomplete-weather": {
      "relativePath": "/search.json",
      "method": "get",
      "requestSchema": {
        "q": {
          "location": "query",
          "description": null
        }
      },
      "responseSchema": {},
      "injectionSchema": null,
      "tags": null
    },
    "ip-lookup": {
      "relativePath": "/ip.json",
      "method": "get",
      "requestSchema": {
        "q": {
          "location": "query",
          "description": null
        }
      },
      "responseSchema": {},
      "injectionSchema": null,
      "tags": null
    },
    "time-zone": {
      "relativePath": "/timezone.json",
      "method": "get",
      "requestSchema": {
        "q": {
          "location": "query",
          "description": null
        }
      },
      "responseSchema": {},
      "injectionSchema": null,
      "tags": null
    },
    "astronomy": {
      "relativePath": "/astronomy.json",
      "method": "get",
      "requestSchema": {
        "q": {
          "location": "query",
          "description": null
        },
        "dt": {
          "location": "query",
          "description": null
        }
      },
      "responseSchema": {},
      "injectionSchema": {},
      "tags": null
    }
  },
  "injectionSchema": null
}'
Weather API schema を表示して更新する
WeatherAPI.com へのリクエストには API key が必要です。Squid では Squid Secrets を使って API key を安全に保存できます。さらに、Squid の injection 機能を使って、すべてのリクエストに自動で key を含めることもできます。API key を injection することで、API key を安全に保ちながら、Squid application から送るすべての WeatherAPI リクエストを自動で認証できます。
- Squid Console で weather connector schema に移動します。

https://api.weatherapi.com/v1である base URL をクリックします。

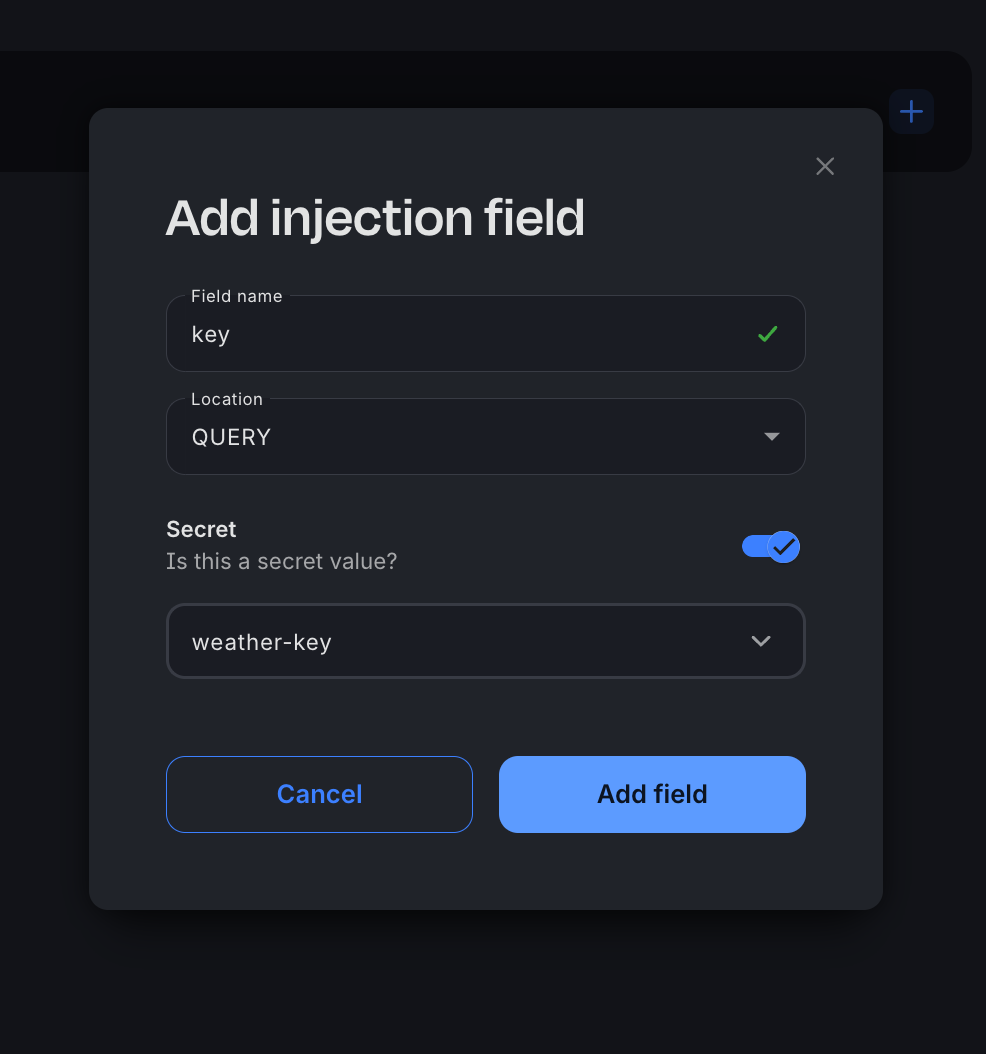
- Injections エリアの + をクリックして、新しい injection を追加します。
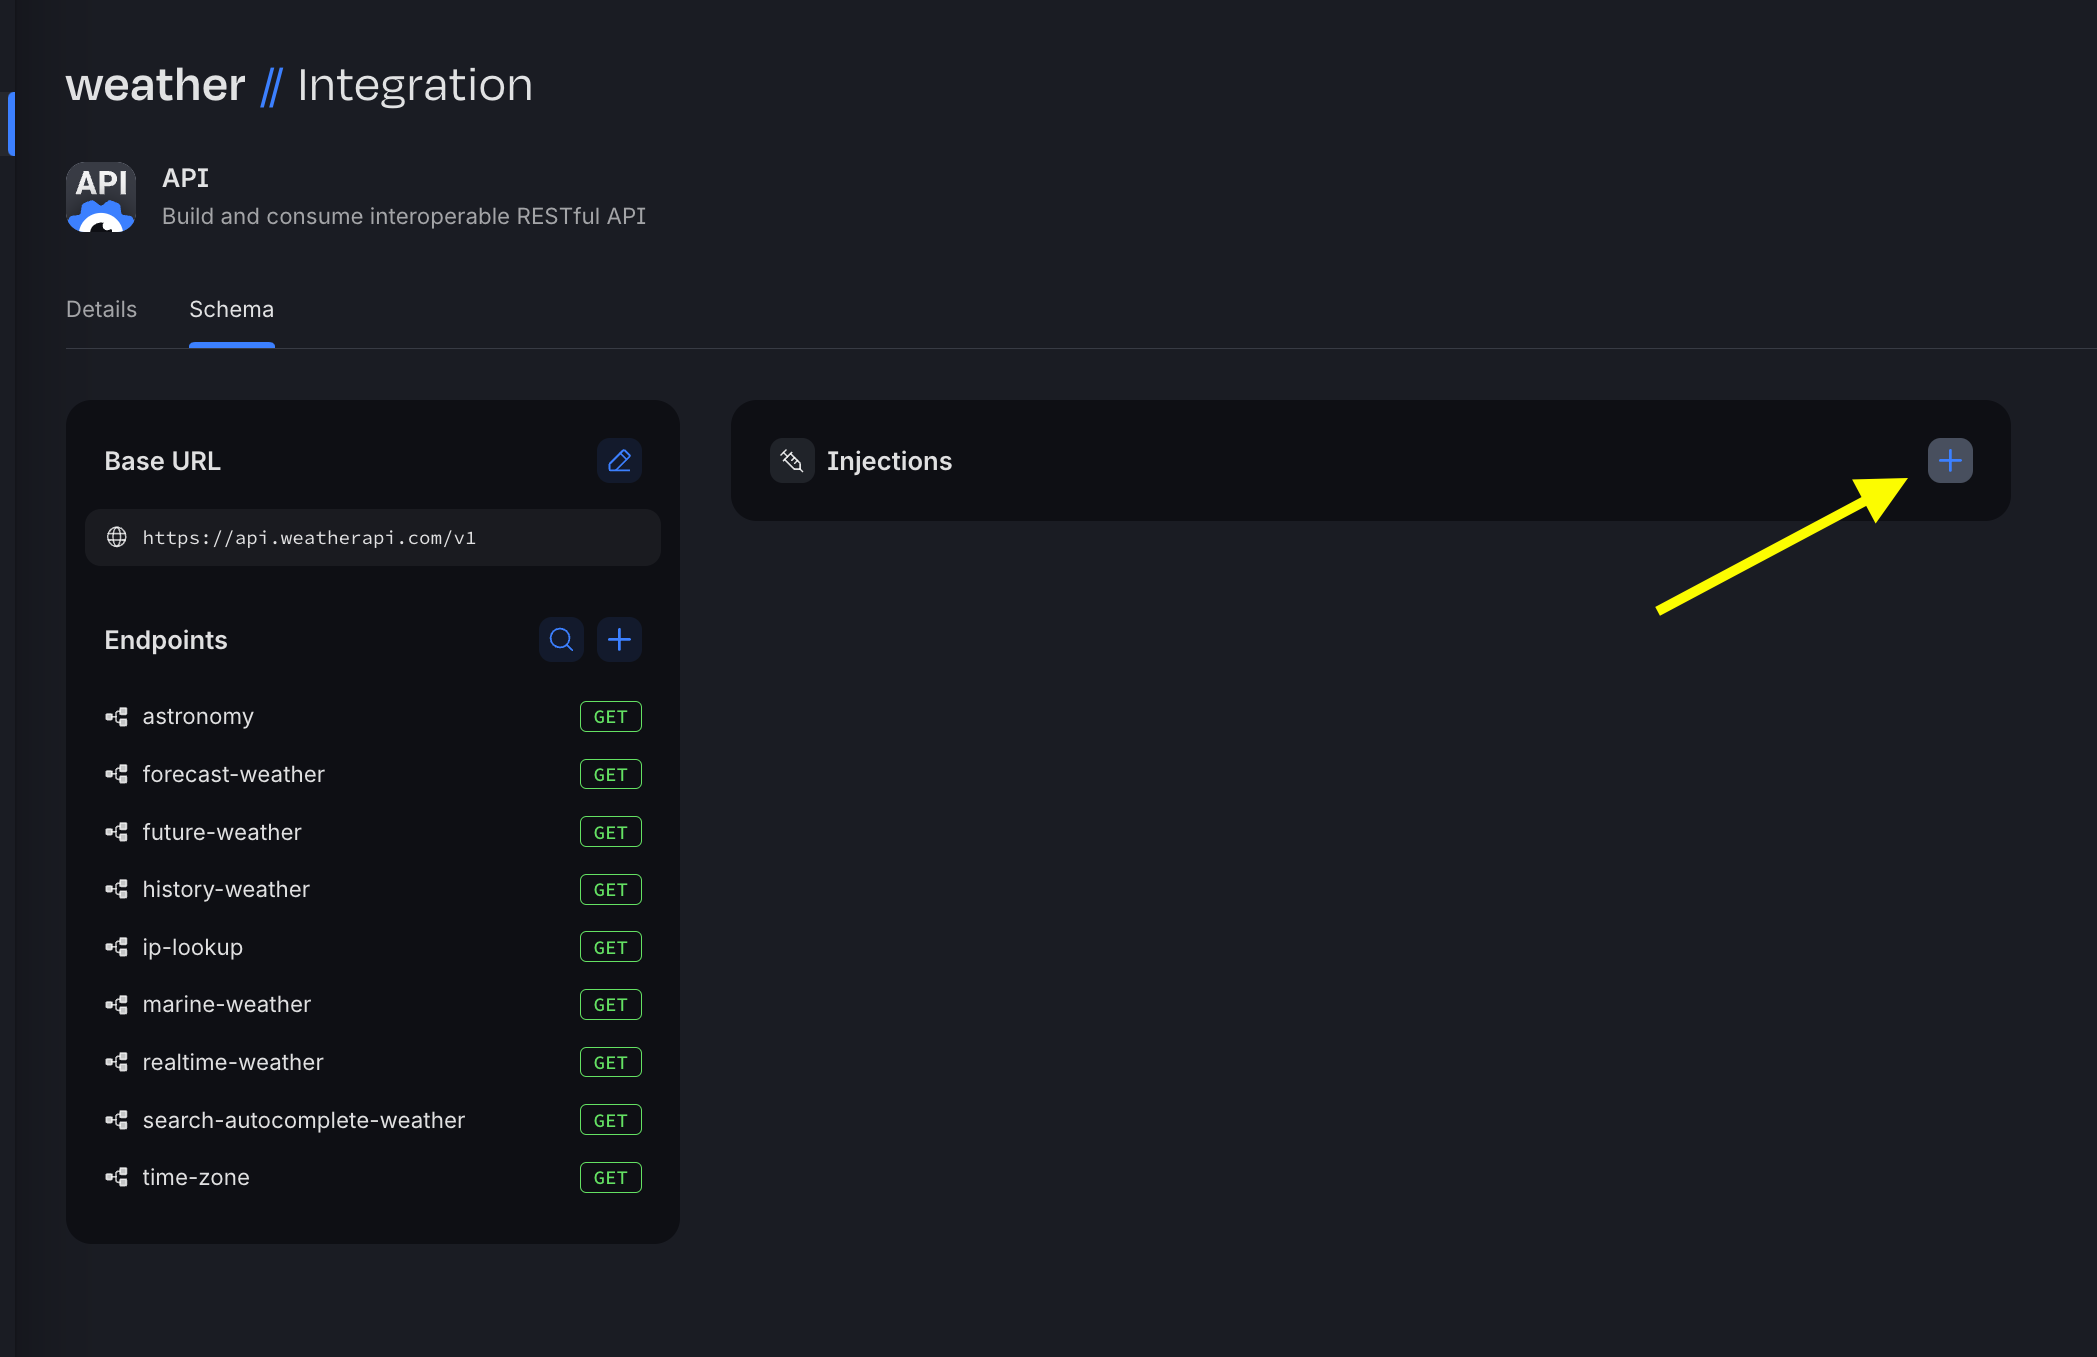
- Field name は key、Location は query です。Secret をオンにして、新しい secret を作成します。secret value には WeatherAPI.com API key を貼り付けます。secret が保存され、選択されていることを確認してください。次に、右上の Save Schema ボタンをクリックして schema を保存します。
Real-time Product Search API に接続する
AI agent が提案したアイテムを持っていない場合に備えて、このアプリは Google Shopping へのリンクを提供し、必要なものを簡単に購入できるようにします。これは RapidAPI 上で利用できる product search API を使用して実現します。
- Real-time Product Search API に移動して subscribe します。WeatherAPI.com API と同様に API key が必要です。サインアップ後、Open playground をクリックして API key を確認します。

- 次のコマンドを使用して Squid connector を生成します。
YOUR_SQUID_APP_IDとYOUR_SQUID_API_KEYのプレースホルダーを Squid app の値に置き換えてください:
curl -X PUT https://console.us-east-1.aws.squid.cloud/openapi/iac/applications/YOUR_SQUID_APP_ID-dev/integrations/product-search -H "x-app-api-key: YOUR_SQUID_API_KEY" -H "Content-Type: application/json" -d '{
  "id": "product-search",
  "configuration": {
    "discoveryOptions": {}
  },
  "type": "api"
}'
- 次の cURL コマンドを実行して connector に API schema を追加します。
YOUR_SQUID_APP_IDとYOUR_SQUID_API_KEYのプレースホルダーを Squid app の値に置き換えてください:
curl -X PUT https://console.us-east-1.aws.squid.cloud/openapi/iac/applications/YOUR_SQUID_APP_ID-dev/integrations/product-search/schema -H "x-app-api-key: YOUR_SQUID_API_KEY" -H "Content-Type: application/json" -d '{
  "type": "api",
  "baseUrl": "https://real-time-product-search.p.rapidapi.com",
  "endpoints": {
    "search": {
      "relativePath": "search",
      "method": "get",
      "requestSchema": {
        "q": {
          "location": "query",
          "description": null
        },
        "country": {
          "location": "query",
          "description": null
        },
        "language": {
          "location": "query",
          "description": null
        },
        "limit": {
          "location": "query",
          "description": null
        },
        "sort_by": {
          "location": "query",
          "description": null
        }
      },
      "responseSchema": {
        "data": {
          "location": "body",
          "path": "data",
          "description": null
        }
      },
      "injectionSchema": {
        "X-RapidAPI-Host": {
          "value": "real-time-product-search.p.rapidapi.com",
          "type": "regular",
          "location": "header"
        }
      },
      "tags": null
    }
  },
  "injectionSchema": null
}'
-
Squid Console で Connectors タブをクリックし、weather connector と同様に product-search connector schema に移動します。
-
search endpoint をクリックします。
-
Injections エリアの + をクリックして、新しい injection を追加します。
-
Field name は X-RapidAPI-Key、Location は header です。Secret をオンにして、新しい secret を作成します。secret value には RapidAPI API key を貼り付けます。secret が保存され、選択されていることを確認してから、新しい injection を保存します。
AI Agent を追加する
-
Squid Console で Agent Studio タブに移動します。
-
Create New Agent をクリックして agent を追加します。次の詳細を入力してください:
- Agent ID:
planner - Description:
This is an agent for Squid AI's vacation planner tutorial
-
Create をクリックして agent を作成します。
-
Instructions フィールドに、次の指示を追加します:
You are designed to create a list of items to pack for a trip based on the provided weather forecast and date, where the date is a string. You should create 3-5 items.
これらの指示は、AI agent に取るべきアクションを伝えます。
Squid application を確認する
フロントエンドとバックエンドの両方が動作している状態で、Web ブラウザで http://localhost:5173/ にアクセスします。これで count button を試し、Squid application の機能を確認する準備ができました:
-
旅行先候補の zip code を入力します。例: 90210。
-
次の 14〜90 日以内の休暇の開始日と終了日を入力します。デモ目的のため、このアプリケーションでは 5 日間の休暇に制限しています。これはアプリが行う API call の数を抑えるのに役立ちます。
-
Submit をクリックし、提案された持ち物アイテムが追加されていく様子を確認しましょう!
次のステップ
- Squid AI agents について詳しくは、documentation を参照してください。
- Squid の real-time data 機能について詳しくは、Client SDK documentation を参照してください。
- 自分のデータソースとの統合方法については、database connectors documentation を参照してください。