Next.js と Netlify を使用した Notes App
Squid を backend として使用し、Netlify に deploy される full-stack notes app を構築します。
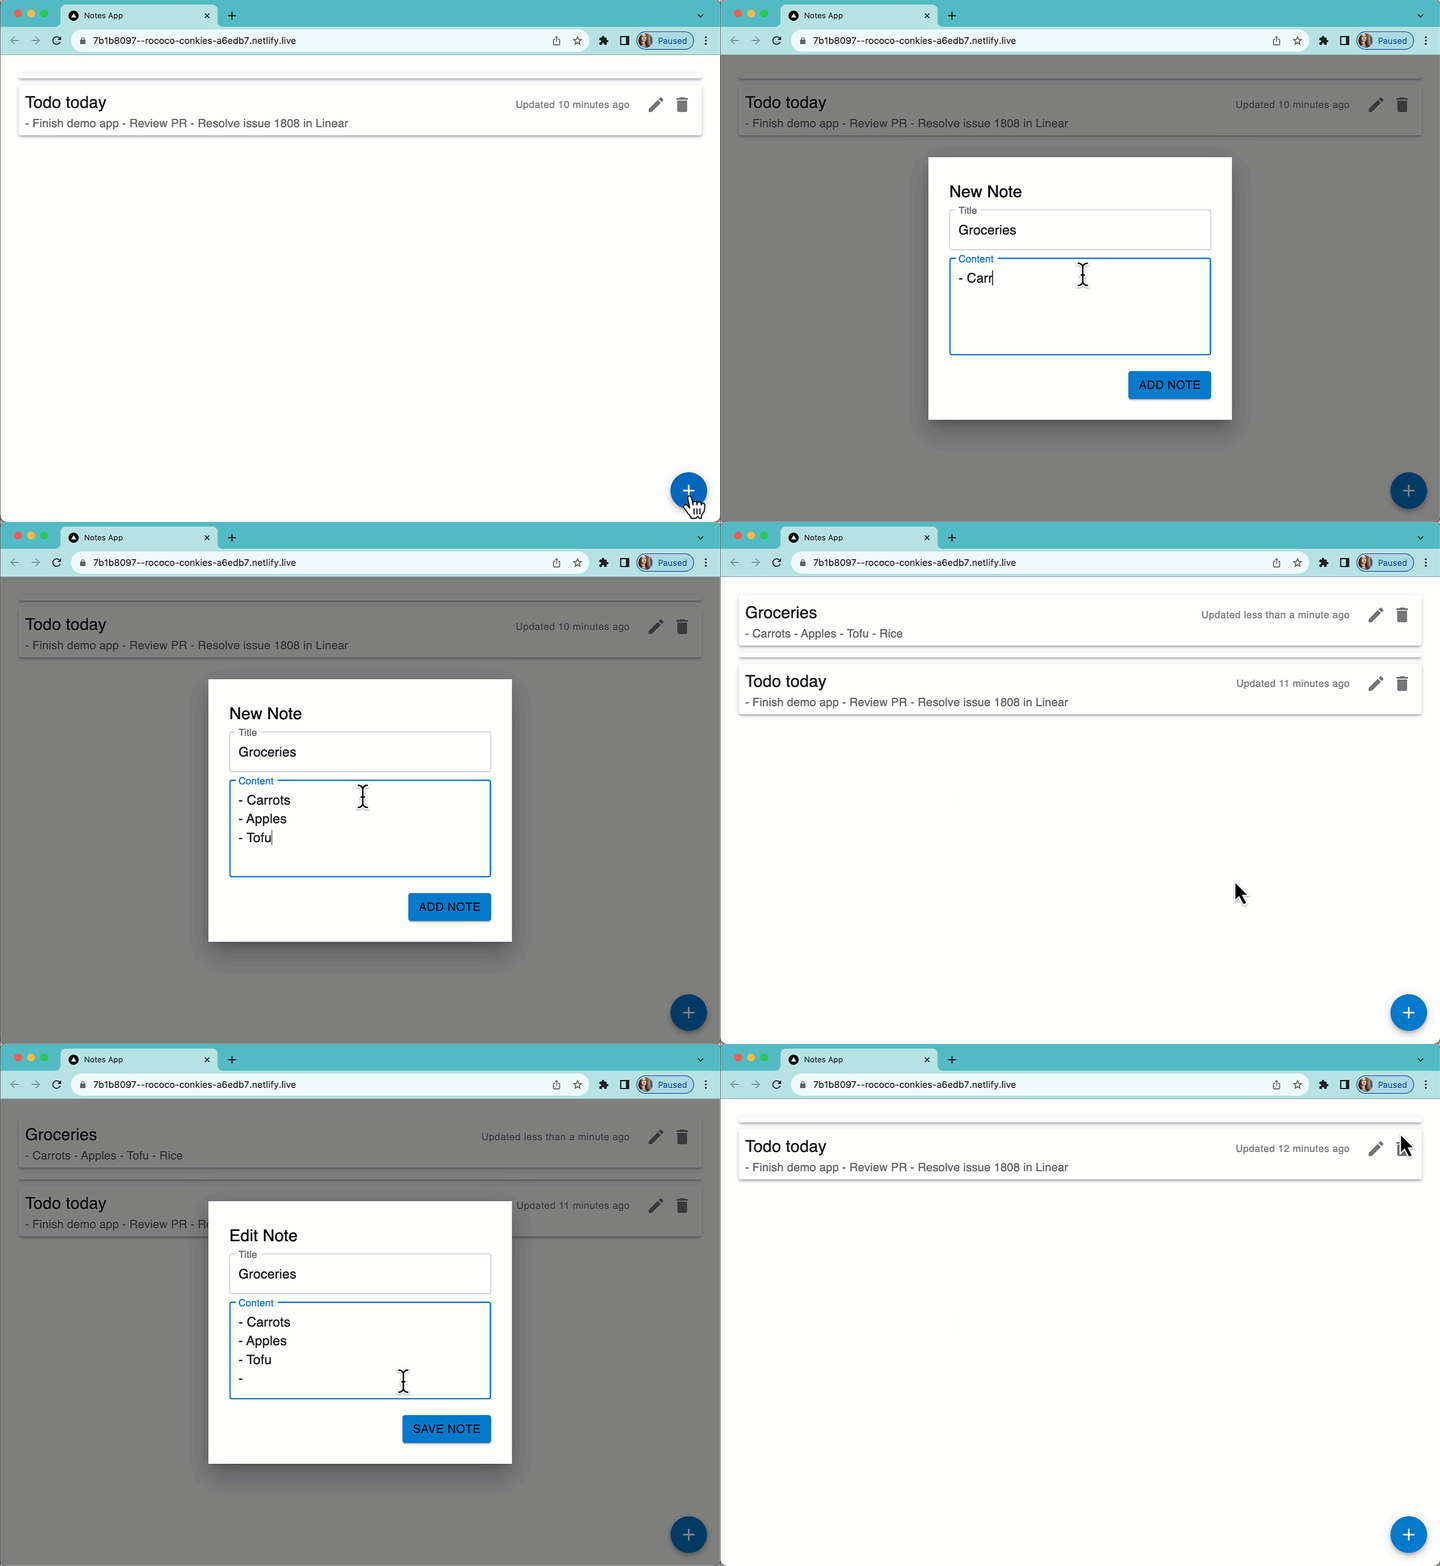
構築するもの:
- Netlify 上で実行される Squid と Next.js を使用する notes application。
- app は Squid の built-in database を使用するため、迅速に setup・実行できます。
学ぶこと:
- server と client の両方で data を query・render し、real-time で最新の状態に保つ方法。
- client で data を mutate する方法。
- Squid Client SDK が Netlify environment variable と連携するよう構成する方法。
TypeScript のある程度の experience が必要です。Next.js と Netlify の experience があると役立ちますが、必須ではありません。
Environment Setup
- notes-app code sample を download します。
npm @squicloud/cli init-sample notes-app --template notes-app
-
任意の IDE で project を開きます。
-
次の command を使用して Netlify CLI を install します。
npm install -g netlify-cli
Squid Backend をセットアップする
There are two subfolders that make up the notes-app project: frontend and backend. The backend folder contains the Squid backend for the app.
Navigate to the Squid Console and create a new application named
notes-app.
- In the Squid Console, navigate to the application overview page and scroll to the Backend project section. Click Create .env file and copy the command.
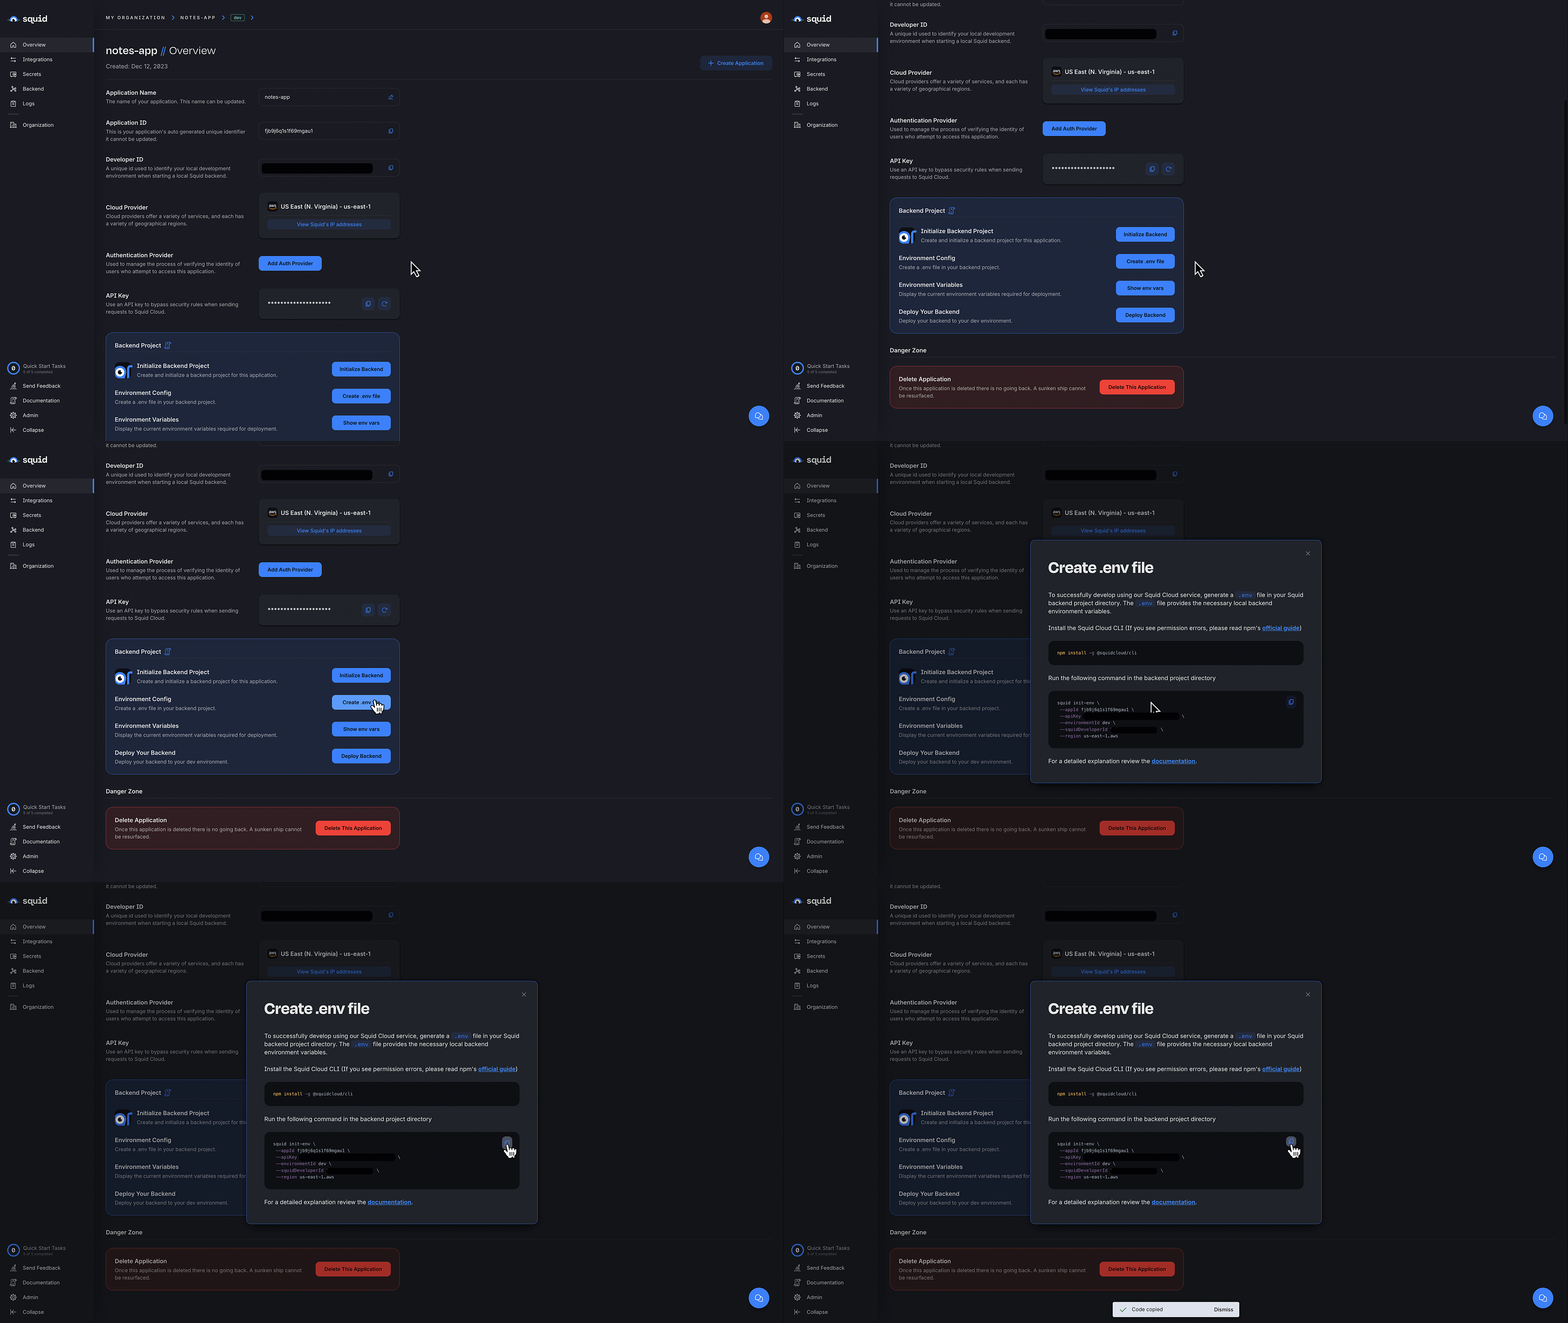
- In the terminal, change to the backend directory:
cd backend
- Create the
.envfile using the command you copied from the console. The command has the following format:
squid init-env --appId YOUR_APP_ID --apiKey YOUR_API_KEY --environmentId dev --squidDeveloperId YOUR_SQUID_DEVELOPER_KEY --region us-east-1.aws
- Install the required dependencies:
npm install
The backend is now set up and ready to use with a frontend!
Next.js Frontend を構成する
以下の step で、application を Squid と Next.js に接続するための configuration parameter を追加します。
- 新しい terminal window を開き、notes app frontend に移動します。これで app の backend 用と frontend 用の 2 つの terminal window が開いている状態になります。
cd notes-app/frontend
- 必要な dependency を install します。
npm install
- Netlify project を作成します。
netlify sites:create
.env.localfile を作成します。
touch .env.local
.env.localfile に以下の code を追加し、placeholder を Squid developer ID に置き換えます。ID は backend の.envfile と Squid Console で確認できます。
SQUID_DEVELOPER_ID=YOUR_SQUID_DEVELOPER_ID
netlify.tomlfile を開きます。placeholder を app ID に置き換えます。app ID は backend の.envfile と Squid Console で確認できます。
...
SQUID_APP_ID = "YOUR_APP_ID"
...
Notes App Component を確認する
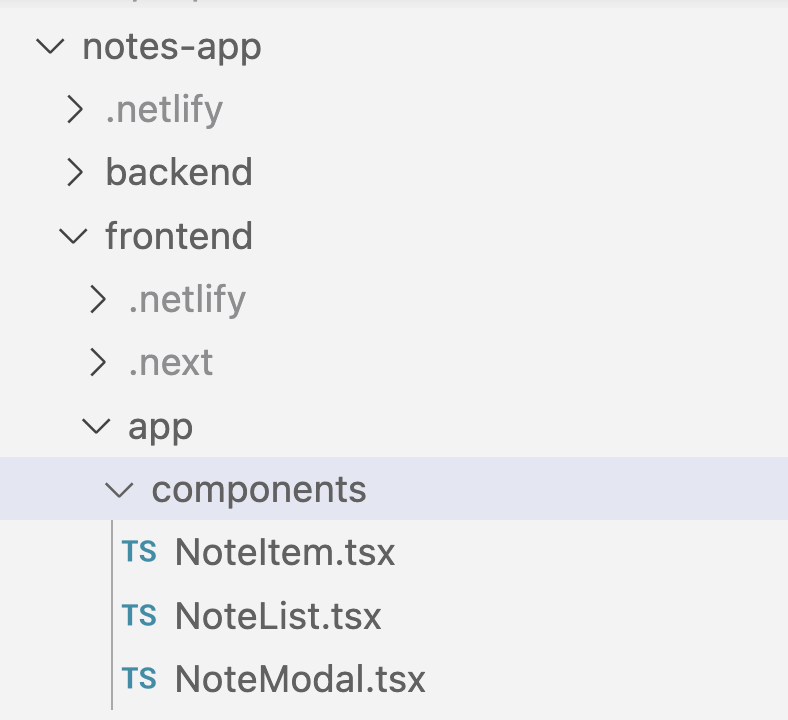
notes app には、app の appearance と behavior を管理する 3 つの main component があります。
NoteItem- notes list 内の各 note を表示します。NoteList- notes list を render し、user が新しい note を追加するか既存 note を update するとNoteModalcomponent を表示します。NoteModal- note の追加時にこの modal が表示され、user は note の title と content を記述できます。
Squid が notes data を real-time で seamless に処理する方法の概要を以下に示します。
handleSavefunction で、Squid は note を database に保存します。
await collection.doc(id).update({
  title,
  content,
  timestamp,
});
- Squid は note の delete も処理します。
collection.doc(id).delete();
Homefunction で、Squid はこの function を使用して database から real-time update を取得します。
await squid.collection<Note>('notes').query().sortBy('timestamp', false).dereference();
Notes Application をローカルで実行する
- notes app backend 用に開いた terminal で、以下の command を使用して Squid backend をローカルで start します。
squid start
- notes app frontend 用に開いた terminal で、以下の command を使用して Next.js frontend を start します。
netlify dev --live
Netlify が local server の setup を完了すると、terminal に http://[RANDOM_ID].netlify.live format の application link が log 出力されます。link をクリックして notes app を開きます。
これで完了です!
おめでとうございます!Next.js と Squid を使用する note-taking application を正常に作成し、Netlify でローカルに serve しました。Netlify と Squid を組み合わせることで、real-time data を利用し、数百万 user に scale 可能な application を seamless に構築・deploy できます。
次に試せること:
- React CRUD app を構築し、Squid React SDK の基本を試す。
- Squid backend を deploy する方法を学ぶ。
- Client SDK documentationを読み、Squid の data query capability の詳細を学ぶ。
- Squid Backend SDK を使用して app data を保護する。
- 利用可能な Integrations を確認し、database、auth、API tool を Squid に接続する方法を確認する。
- Next.js と Squid の詳細については、この tutorialを確認する。
- Squid と Netlify による full stack app の詳細については、この tutorialを参照する。
Additional Note
Notes App Functionality
app でいくつか note を作成し、以下を確認します。
-
modal で
Add Noteをクリックすると、modal が close するまでのわずかな間に新しい note が notes list に表示されます。これは Squid Client SDK が optimistic update を実行し、server に mutation を送信すると同時に local state を update するためです。server update が failure した場合、client は以前の data に fallback します。 -
新しい tab を開き、同じ url に移動します。作成した note がすぐに表示されます。これは app が
withServerQueryserver component を使用しており、server で data を fetch して pre-rendered の状態で client に送信するためです。これは application performance を向上させる優れた方法です。 -
一方の tab で notes list と interaction すると、もう一方の tab の notes list も update されます。これは Squid Client SDK が data の change を自動的に subscribe し、local state を update するためです。
Squid Environment
- Squid は 2 つの異なる target environment を提供します。development 用の
devと production 用のprodです。この tutorial ではdevenvironment を使用します。詳細については、Squid の environmentを参照してください。 - Squid developer ID は、project をローカルで実行する場合にのみ使用されます。
context.prod.environmentのSQUID_DEVELOPER_IDは local development 専用のため、意図的に空欄です。development 用には.env.localfile で設定されます。これを空欄のままnetlify.tomlfile に追加することで、production build に含まれないことを確保します。
Squid Functionality
- Squid built-in database を使用する場合、Squid backend は additional customization なしで完全に機能します。Scheduler、database event に response する Trigger、raw SQL または database-specific query を実行する native query などの feature を Squid backend に追加することもできます。すべての option を確認するには、Backend SDK docsを参照してください。
- built-in database は document-based であるため、notes collection は document collection を表します。SQL database を使用する場合、collection は table を表し、document は table の row です。
Next.js Link
layout.tsxのNotesfunction は Next.js server component です。Next.js server component の詳細については、Next.js Server Components documentationを参照してください。NoteList.tsxfile の先頭にある'use client'は、この file を client で render すべきことを Next.js に示します。Next.js client component の詳細については、Next.js Client Components documentationを参照してください。