RAG Agent を実装する
ドキュメントを AI agent の knowledge base に統合し、その後データに対してアクションを実行します
作成するもの
- 製品マニュアルをコンテキストとして使用し、家電に関する質問に回答できる AI agent を備えたアプリ。要求があれば、メンテナンス作業のリストも作成します。
このチュートリアルでは、以下の機能を使用します:
| AI Abilities | Internal Connectors | Backend Functions |
|---|---|---|
| Knowledge base | Built-in Database | Webhooks |
このチュートリアルでご一緒いただいたパートナーの Otairo に多大なる感謝を!
環境セットアップ
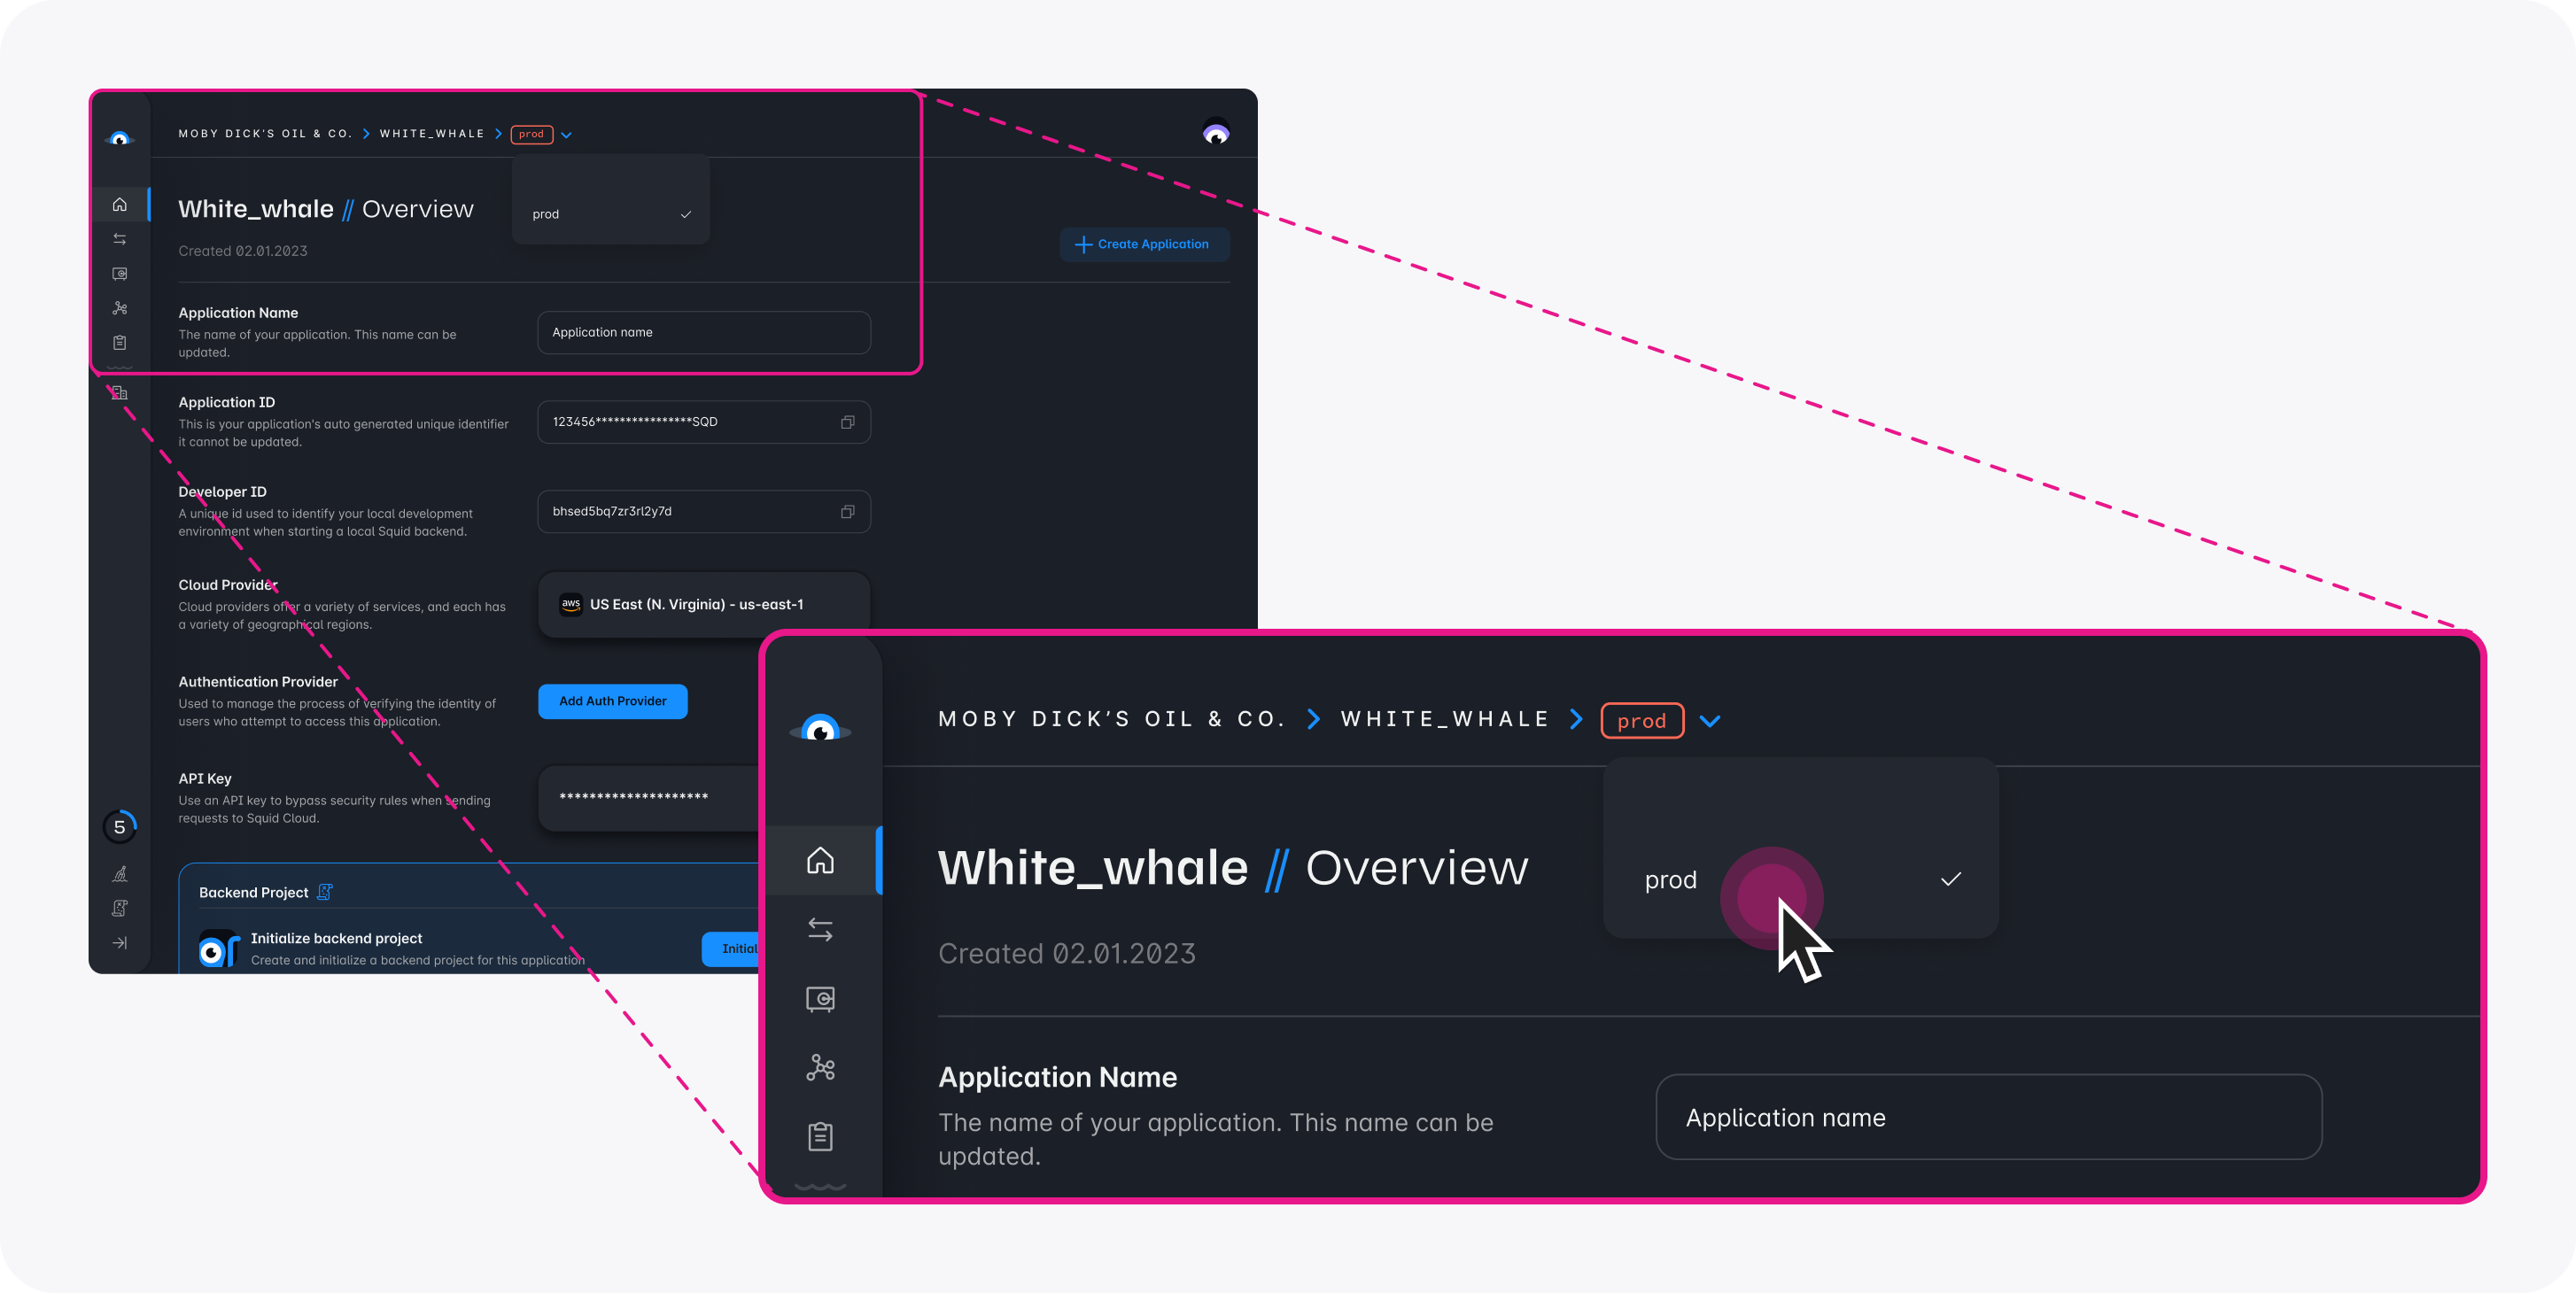
- In the Squid Console, switch to the
devenvironment.
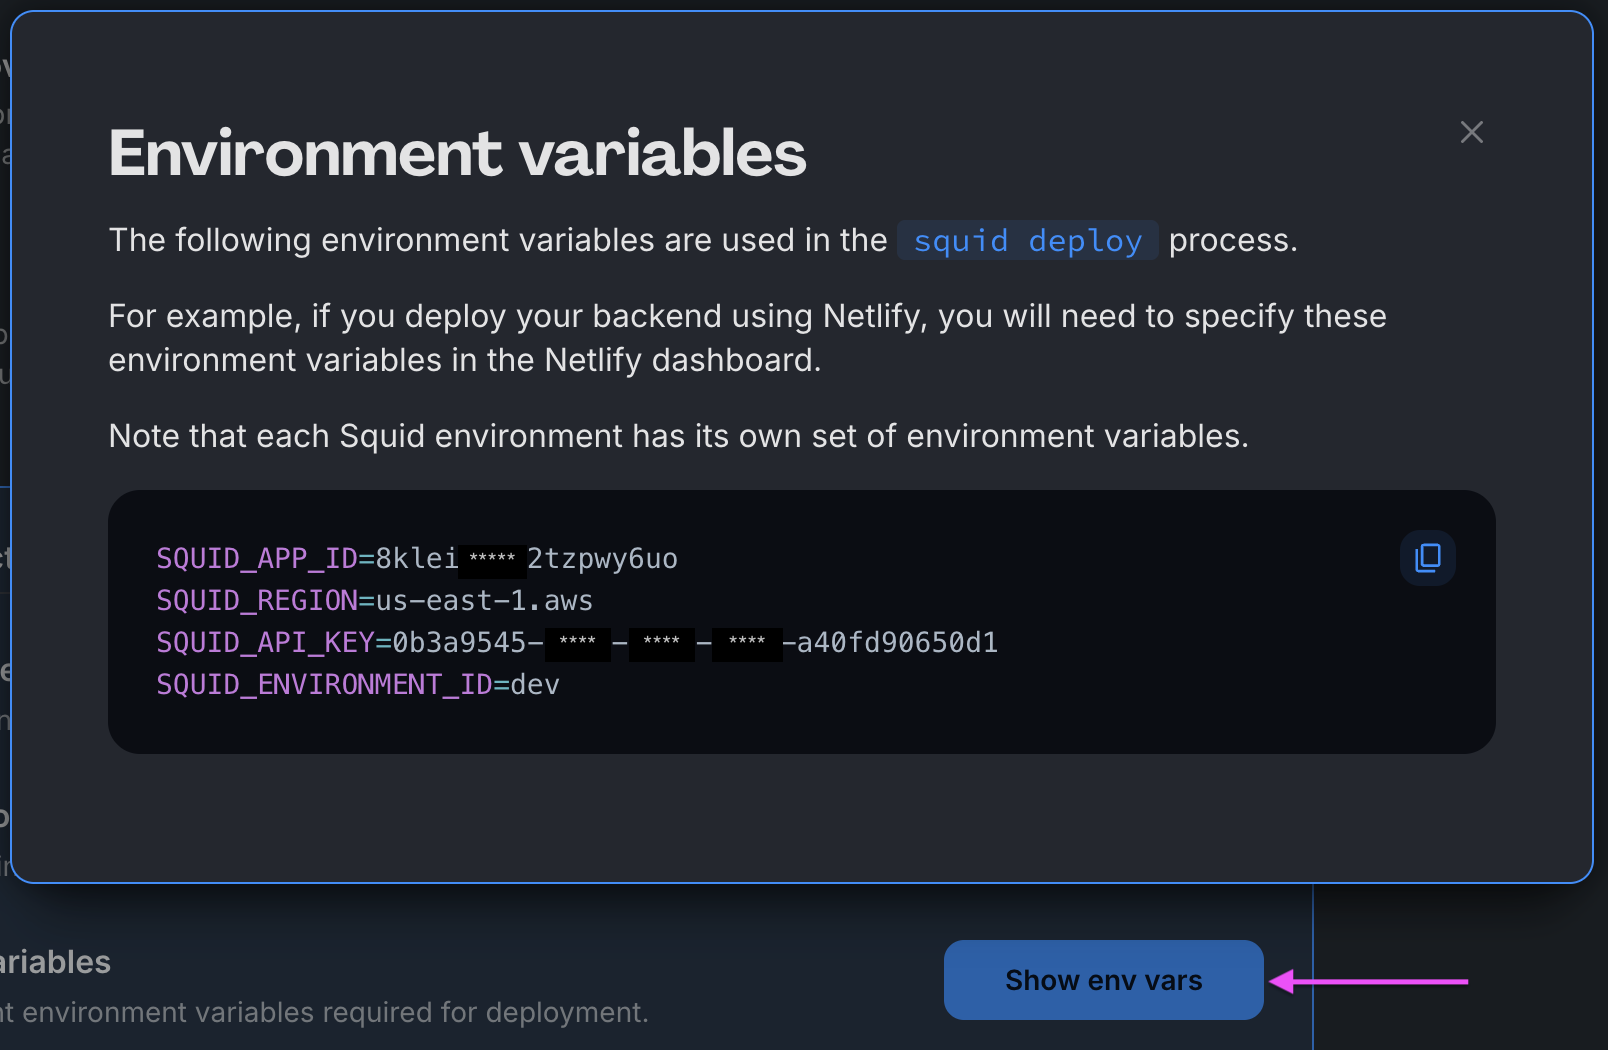
Download the ai-home-maintenance code sample using the following command. Replace the placeholders with the values from your Squid application as shown in the console.
npx @squidcloud/cli init-sample ai-home-maintenance --template ai-home-maintenance --appId YOUR_SQUID_APP_ID --apiKey YOUR_SQUID_API_KEY --environmentId dev --squidDeveloperId YOUR_SQUID_DEVELOPER_ID --region YOUR_REGION
You can find your environment variables under: 'Application' -> 'Show env vars' as seen below:
- Open the project in the IDE of your choice.
- Start the app locally by running the following command in the project folder:
npm run start
- To view the app, navigate to localhost:PORT, where PORT is logged in the terminal. The address will likely be
http://localhost:5173.
アプリケーションは正常に起動するはずですが、次のステップを完了するまでは完全には機能しません。
AI agent を追加する
各 agent は、それぞれの指示 (instructions) と abilities のセットによって区別される、異なるペルソナまたはユースケースを表します。
-
Squid Console で Agent Studio タブに移動します。
-
Create New Agent をクリックして agent を追加します。以下の内容を入力してください:
- Agent ID:
maintenance-scheduler - Description:
This is an agent for Squid AI's home maintenance tutorial
-
Create をクリックして agent を作成します。
-
Instructions フィールドに、次の指示を agent に追加します:
Respond to queries about home maintenance documents. Only use the provided context to generate responses. Never respond based on your general knowledge. When applicable, list the source document used. If a question cannot be answered using the provided context, state that clearly and do not attempt to answer using general knowledge.
これらの指示は、AI agent に実行すべきアクションを伝えます。
- 次に Agent Settings タブへ移動します。下へスクロールして Set Agent to Public を見つけ、この設定をオンに切り替えます。 これにより、セキュリティルールを記述しなくても、agent を公開アクセス可能にできます。
本番環境へデプロイする前に、適切なセキュリティルールが設定されていることを確認し、Public access を有効にしたまま agent を実行しないようにしてください。agent を安全に保護する方法は、このリファレンス を確認してください。
背景知識を追加する
knowledge base ability は、質問に回答するときに agent にコンテキストを提供します。コンテキストを追加することで、基盤となる AI model に含まれていない可能性のある特定トピックについても、関連性の高い回答を返せるようになります。
- 次の家電マニュアルを PDF ファイルとしてダウンロードします:
Oven:
https://media3.bosch-home.com/Documents/8001203758_A.pdf
Microwave:
https://media3.bosch-home.com/Documents/9001152447_B.pdf
Dishwasher:
https://media3.bosch-home.com/Documents/9001641455_A.pdf
Washer/dryer:
https://products-salsify.geappliances.com/image/upload/s--pdIsKW0u--/izid0w85hg3mbckeyyo1.pdf
あるいは、オンラインでご自身の家電のマニュアルを検索し、それらをコンテキストとして提供しても構いません。これにより、家電について抱いている疑問を質問できるようになります。
-
Add Abilities をクリックし、Knowledge Base の下にある File ability を選択します。
-
4 つのファイルそれぞれをアップロードします。各ファイルのアップロードには時間がかかる場合があるので、しばらく待ってください。agent が自動的にドキュメントから内容を抽出し、テキストを knowledge base に追加します。
Squid アプリケーションを試す
プロジェクトのルートディレクトリで次のコマンドを実行し、両方のサーバーを起動します:
npm run start
両方のサーバーが起動したら、Web ブラウザで http://localhost:5173/ にアクセスします。これで、Squid アプリケーションの機能を試す準備が整いました:
- 家電について質問してみましょう。たとえば、次のように質問できます:
How do I clean my cooktop?
AI agent は、マニュアルから得た詳細をチャットで返答します。
- 家電のメンテナンス用タスクリストを作成するよう、AI agent に指示します:
Create a list of maintenance tasks.
しばらくすると、新しいタスクがアプリケーション右側のリストとして表示されます。これは、AI agent がマニュアルをコンテキストとしてメンテナンスタスクを作成し、さらにあなたの代わりにそのタスクを database に書き込めたことを意味します。
-
いくつかのタスクを完了したら、Squid の Query with AI 機能を使って追加の質問ができます。この機能は、database schema の知識を使い、プロンプトに基づいてクエリを生成します。
アプリが自動検出した schema を保存するには、Squid Console に移動し、Connectors タブを開いて、built_in_db 上の
...ボタンをクリックしてドロップダウンメニューを開きます。ドロップダウンから Schema を選択します。 -
Save Schema をクリックして、アプリが自動検出した schema を保存します。
-
タスクのいくつかにチェックを入れて完了扱いにし、その後 AI agent に次を尋ねます:
Which maintenance tasks have I completed?
AI agent は database をクエリして、どの項目が完了しているかを特定できます。つまり、AI agent はその場で database クエリを生成できるということです!
- AI agent は、より複雑な指示も認識して応答できます。たとえば、次のようにプロンプトを与えます:
Look up in the manual to determine how often I should clean my washer-dryer lint filter. Based on that interval, if I run two loads of laundry a day, how often should I clean the filter?
AI agent は lint filter を清掃する頻度を判断し、それをあなたの質問条件に当てはめて、論理的な回答を返すことができます。
コードを見る
Squid によって動く AI agent を備えたフルスタックアプリの構築に成功しました!内部で何が起きているのか気になりますか?このセクションではコードを掘り下げます。
フロントエンドで AI agent を設定する
Squid React SDK の useAiChat hook を使用すると、次のコードで AI agent に接続できます:
const { history, chat, complete } = useAiChat('maintenance-scheduler');
AI agent に機能を追加する
Squid AI Agent は、プロンプトに応じて異なるアクションを実行できます。これは、Squid backend で @aiFunction decorator を使って関数を指定し、options パラメータの一部としてプロンプトと一緒に関数を渡すことで実現します。
たとえば、次の AI function は家電マニュアルからメンテナンスタスクのリストを作成し、logMaintenanceScheduleInternal() 関数を使って built-in database にタスクを書き込みます:
  @aiFunction(
  'If someone asks for a list of maintenance tasks, run this function. This function creates a maintenance task for a list of tasks. Pass each created task to this function. If the user asks how to complete a specific task, then do not run this function. !Important: if a user asks questions about **existing** tasks in the database, then do not run this function.',
  [
    {
      name: 'task',
      description: 'the task to complete',
      type: 'string',
      required: true,
    },
    {
      name: 'interval',
      description: 'the frequency or interval at which the task needs to be done',
      type: 'string',
      required: true,
    },
    {
      name: 'appliance',
      description:
        'the appliance that requires the given maintenance. Provide the manufacturer name of the appliance, along with the type of appliance',
      type: 'string',
      required: true,
    },
  ],
)
async
createTaskItem(params
:
{
  task: string;
  interval: string;
  appliance: string
}
)
{
  const { task, interval, appliance } = params;
  await this.logMaintenanceScheduleInternal({ task, interval, appliance, completed: false });
}
@aiFunction decorator には、関数の目的を説明するパラメータが含まれている点に注目してください。AI agent はこの情報を使って、いつその関数を呼び出すべきかを判断します。
2 つ目の AI function は、プロンプトに基づいて database をクエリし情報を取得します:
  @aiFunction(
  " !Important: Call this function when a client prompt requests information about the **existing** tasks in their database. This function queries the database for tasks that meet the client's request. Include the exected query in your response",
  [
    {
      name: 'prompt',
      description: 'the request from the client',
      type: 'string',
      required: true,
    },
  ],
)
async
checkTasksAI(params
:
{
  prompt: string
}
):
Promise < string > {
  const { prompt } = params;
  const response = await this.squid.ai().executeAiQuery('built_in_db', prompt);
  return `${response.answer} \n ${response.executedQuery}`;
}
フロントエンドでは、次のコードを使って各プロンプトと一緒に functions を渡します:
chat(question, { functions: ['checkTasksAI', 'createTaskItem'] }); // Add functions in the second parameter
その後 AI agent が、プロンプト内容に応じて関数を実行するかどうかを判断します。
AI functions の詳細は、AI functions documentation を参照してください。
次のステップ
おめでとうございます!ドキュメントを読み取って質問に回答し、ドキュメント内容に基づいて database に書き込み、さらにクライアントのプロンプトに基づいて database から読み取れる AI agent を、アプリケーションに追加できました。
- Squid AI agents の詳細は、documentation を参照してください。
- Squid の real-time data 機能の詳細は、Client SDK documentation を参照してください。
- 自分のデータソースへ接続する方法は、Database connectors documentation を参照してください。