MongoDB Database を接続する
MongoDB database を接続し、Squid の real-time streaming、robust query、AI capability を活用します。
TL;DR
この tutorial では、新しい MongoDB database を Squid project に接続する方法を学びます。内容は以下を含みます。
- Squid Console で integration を作成する
- external database の security rule を適用する
- client project から Squid を使用して MongoDB database に query する
この tutorial では、React と Squid を使用して MongoDB collection の sample data に接続します。database terminology、React、Squid platform の基本的な理解があると役立ちますが、この guide に前提条件はありません。
新しい MongoDB Project を作成する
最初に、MongoDB account にsign inし、新しい project を作成します。MongoDB は project overview page に redirect します。そこで Create button をクリックして database deployment を作成します。この deployment では free M0 tier を選択します。cluster には sample-data などの custom name を付けることもできます。
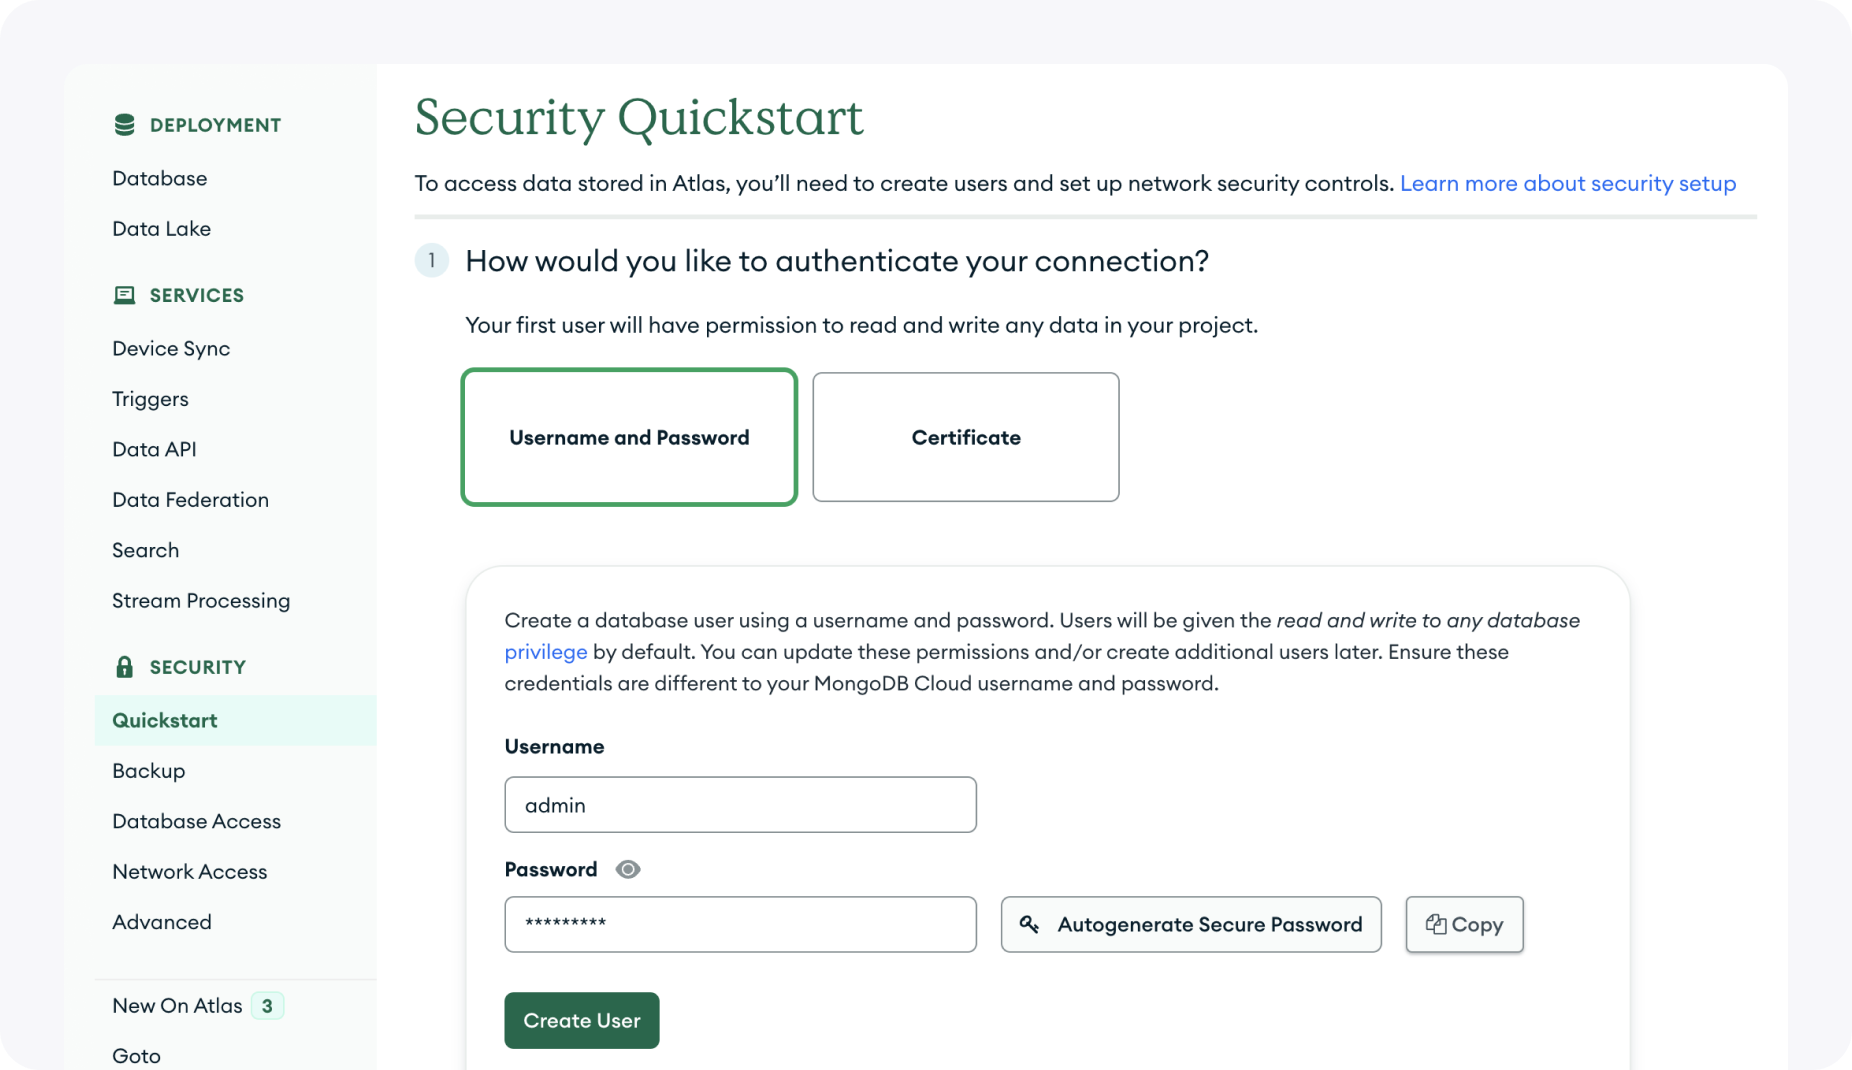
次に、MongoDB は Security section の Quickstart tab に redirect します。これは左 panel の menu にあります。MongoDB database に接続するには、authorized user を作成する必要があります。
step 1 では、username と password を使用して connection を authenticate します。Squid を MongoDB に接続する際に必要になるため、選択した password を copy してください。完了したら Create User をクリックします。
次に、Network Access tab に移動して Squid の IP address を追加します。Squid は database への access を必要とするため、Cloud provider section にある Squid Console の application overview page で確認できる Squid IP address からの access を許可します。Add Entry をクリックして、各 IP address を Access List に追加します。
page 下部の Finish and Close をクリックしてこの setup を完了します。
project overview page では、Database Deployments の下に cluster が表示されます。cluster の Overview page に移動し、cluster の Ellipses (...) button をクリックします。次に Load Sample Dataset をクリックして、MongoDB が提供する starter data を cluster に load します。MongoDB による data の追加には数分かかることがあるため、しばらく待ちます。
data が cluster に追加されたら、Browse Collections をクリックして、listingsAndReviews collection を持つ sample_airbnb database を含む追加済み data を確認できます。
これで MongoDB 側の準備は完了です!次に、MongoDB sample data の使用を開始できるよう、Squid で React project を開始しましょう。
新しい React Project を作成する
最初に、任意の location に root project directory を作成します。
mkdir mongo
次に、mongo directory に cd し、Vite を使用して新しい React typescript application を作成します。
cd mongo
npm create vite@latest mongo-frontend -- --template react-ts
次に、新しく作成された directory に cd し、すべての dependency を install します。
cd mongo-frontend
npm install
Console に新しい App を作成する
Squid Console に移動し、mongo-tutorial(または同様の name)という新しい application を作成します。
Squid は development と production 用に 2 つの異なる target environment を提供します。この tutorial では dev environment を使用していることを前提としますが、prod も option です。application を機能させるには、project 全体を通じて同じ target environment を使用してください。詳細については、Squid の environmentを参照してください。
console の step に従って backend template project を生成します。これらの step を表示するには、application overview page の Initialize Backend button をクリックします。frontend directory と backend directory が sibling になるよう、backend を初期化する前に必ず root project directory に cd で戻ってください。
MongoDB Connector(Integration)を作成する
この tutorial では、"integration" と "connector" という term を interchangeably に使用しており、同じ concept を指します。
console で application の Connectors page に移動し、新しい
MongoDB connector を追加します。integration は environment 間で shared されないため、正しい environment を使用していることを確認してください(上記の注記を参照)。
次に、4 つの input field に value を入力します。
Connector ID: ID には、mongoなど、この integration が表すものを説明する意味のある value を選択しますDatabase Connection String: この string は、MongoDB project overview page のConnectbutton をクリックして確認できます。button をクリックすると、connection method を選択する prompt を含む modal が表示されます。Shelloption を選択し、connection string を確認します。 Squid が必要とする string の部分は、"mongodb+srv"で始まり"mongodb.net"で終わることがほとんどです。前後の character は無視できますが、間にある character は必要です。さらに、使用する database name、"/sample_airbnb"を append します。最終的に string は以下のようになります。mongodb+srv://YOUR_CLUSTER_NAME.SOME_ID_CHARS.mongodb.net/sample_airbnb。
この value を Squid Console に copy します。MongoDB website 側で必要な作業はこれだけです。Database UsernameとDatabase Password: これらの value は MongoDB Setup 中に作成しました。password 用に新しい secret を作成し、value を console に copy します。
database connection string、username、password を指定すると、Squid から MongoDB database への connection が確立されます。
Test Connection button をクリックし、Squid と MongoDB 間の connection が正しく動作していることを確認します。
Next button をクリックすると、Squid は現在 sample_airbnb database にある data に基づいて database schema を自動的に discover します。data が change されるたびに、手動で Rediscover Schema することもできます(ただし、この tutorial では必要ありません)。
これらの step を完了したら、Add Connector をクリックして project に追加します。
error が発生する場合は、Squid IP address が Mongo Atlas website の Network Access tab に追加されていることを再確認してください。Squid IP address は、Squid Console の application overview page の Cloud provider section にあります。
Security Rule
すべての database integration には security rule が必要です。これにより、specific collection または action、そして database 全体への access を authorize するための custom logic を作成できます。authentication と authorization はこの tutorial の scope 外であるため、mongo integration への public access を許可する security rule を作成します。
data の保護について詳しくは、Squid backend の security ruleを参照してください。
security rule は mongo-backend/src/service/example-service.ts file にあります。SquidService class に decorator を追加することで security rule を拡張できます。database integration 用の security rule を作成するには、database action type と CONNECTOR_ID を parameter として受け取る @secureDatabase decorator を使用します。ExampleService class に新しい security rule を作成します。
import { secureDatabase, SquidService } from '@squidcloud/backend';

...

export class ExampleService extends SquidService {

  ...

  @secureDatabase("all", "mongo")
  allowAccessToMongo(): boolean {
    return true; // Allows all access to the mongo integration
  }
}
Client Code を編集する
最後の step は、Squid Client SDK の React version を使用して React project 内で integration を使用することです。
Setup
最初に、mongo-frontend directory で Squid React SDK を install します。
npm install @squidcloud/react
次に、src/main.tsx で App component を SquidContextProvider で wrap します。以下の placeholder を .env file 内の configuration option に置き換えます。
.env file は console で app を作成する際に自動生成され、backend directory にあります。
import ReactDOM from 'react-dom/client'
import { StrictMode } from 'react';
import App from './App.tsx'
import './index.css'
import { SquidContextProvider } from '@squidcloud/react';

...

ReactDOM.createRoot(document.getElementById('root')!).render(
  <StrictMode>
    <SquidContextProvider
      options={{
        appId: 'YOUR_APP_ID',
        region: 'YOUR_REGION', // example: 'us-east-1.aws'
        environmentId: 'dev | prod', // choose one of 'dev' or 'prod'
        squidDeveloperId: 'YOUR_SQUID_DEVELOPER_ID',
      }}
    >
      <App />
    </SquidContextProvider>
  </StrictMode>
);
Project を実行する
project を実行するには、client React project と backend Squid project の両方を開始する必要があります。
backend を実行するには、backend directory から次を実行します。
squid start
client を実行するには、frontend directory から次を実行します。
npm run dev
これで terminal に log 出力される port の http://localhost:PORT で client project が実行されます。 まだ page に render する内容を編集していないため、Vite starter project が表示されます。
Single Document に Query する
Squid method を使用して collection に query する方法は複数あります。最初の方法は、document ID を使用して listingsAndReviews collection 内の single document に query することです。
built-in ではない integration の document ID は object form である必要があります。Squid の document ID の詳細については、documentationを参照してください。
先ほど console で discover した schema は、Squid が primary key に string type の _id field が含まれることを期待していることを示しています。
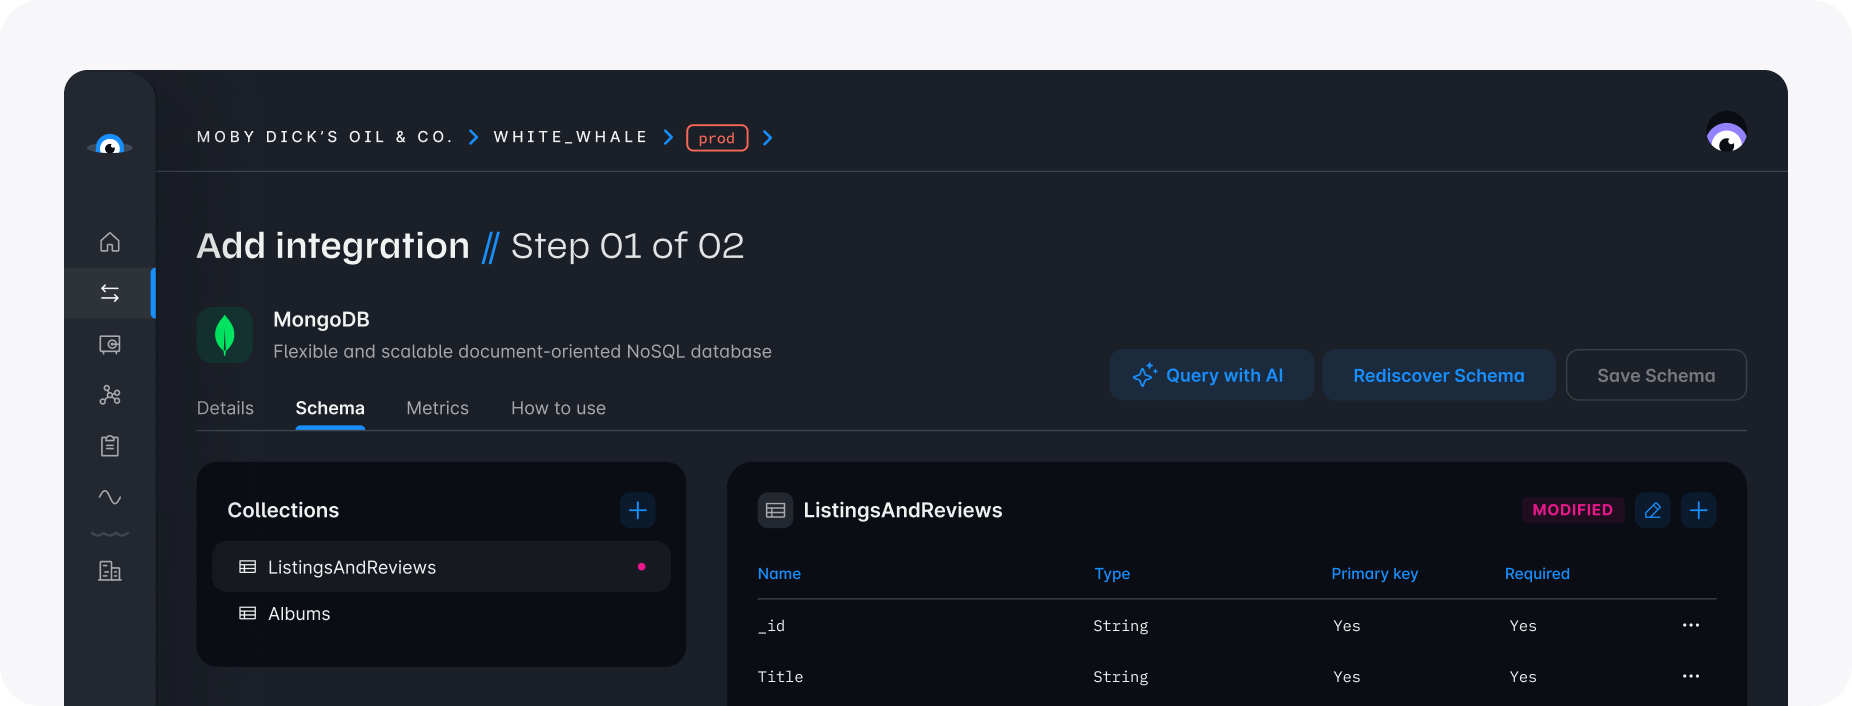
MongoDB 内の data を見ると、任意の entry の _id value を選択してその document に query し、client に data を表示できます。
mongo-frontend/src/App.tsx を次の code に編集します。
import './App.css';
import { useCollection, useDoc } from '@squidcloud/react';

function App() {
  const collectionRef = useCollection('listingsAndReviews', 'mongo');

  const { data: listing } = useDoc(collectionRef.doc({ _id: '10057826' }));

  return (
    <>
      <h2>
        Note: this is MongoDB sample data. Any data displayed here may not be
        accurate
      </h2>
      <div>Name: {listing?.name}</div>
      <div>URL: {listing?.listing_url}</div>
      <div>Price: ${listing?.price}</div>
    </>
  );
}

export default App;
上記と同じ方法で project を実行します。すべてが正しく setup されている場合、次のような表示になります。
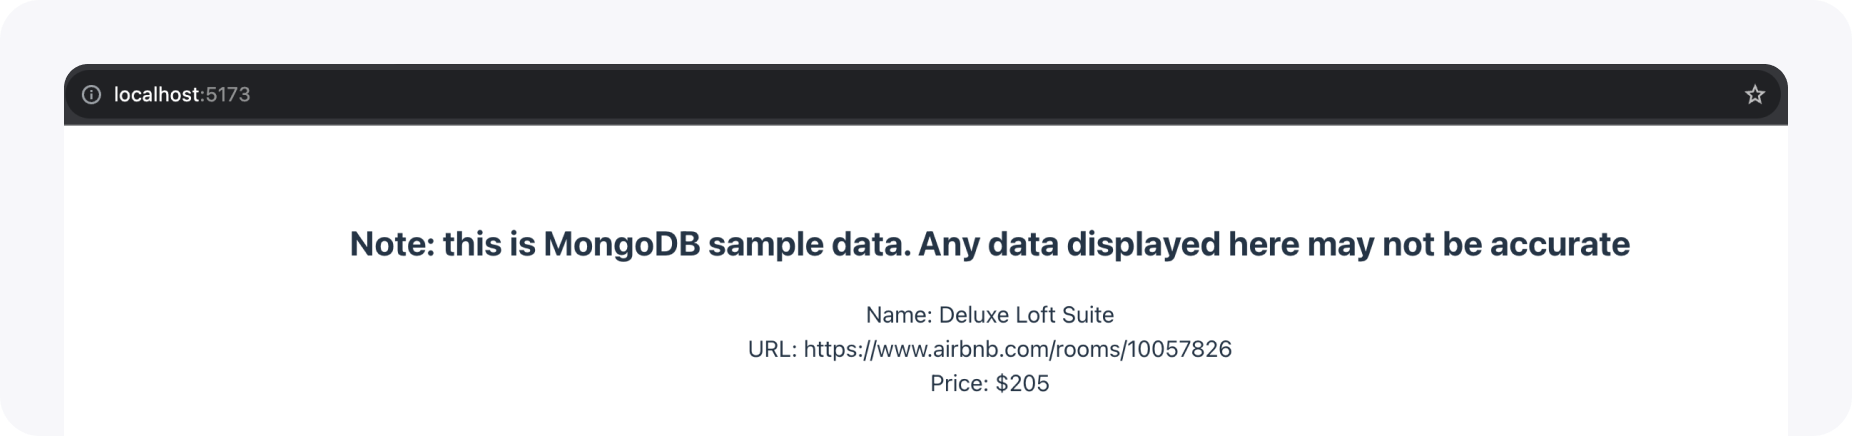
おめでとうございます!external MongoDB database を使用した最初の query を完了しました。query の詳細については、documentationを参照してください。続けて、もう 1 つのより complex な query を記述しましょう。
Query を構築する
「最も安い option は何ですか?」と尋ねることは、AirBnB が提供する最大の treasure を求める digital quest に乗り出すようなものです! Squid の advanced query option を使用すると、利用可能な最も安い option を簡単に見つけられます。query は次のようになります。
const { data: cheapListings } = useQuery(collectionRef.query().where('price', '<=', 10));
location、accommodate 可能な人数などを指定する場合は、この query をさらに拡張できます。
すべてをまとめると、最終的な mongo-frontend/src/App.tsx は以下のようになります。
import './App.css';
import { useCollection, useDoc, useQuery } from '@squidcloud/react';

function App() {
  const collectionRef = useCollection('listingsAndReviews', 'mongo');

  const { data: listing } = useDoc(collectionRef.doc({ _id: '10057826' }));

  const { data: cheapListings } = useQuery(
    collectionRef.query().where('price', '<=', 10)
  );

  return (
    <>
      <h2>
        Note: this is MongoDB sample data. Any data displayed here may not be
        accurate
      </h2>
      <div>Name: {listing?.name}</div>
      <div>URL: {listing?.listing_url}</div>
      <div>Price: ${listing?.price}</div>
      <hr />
      <h3>Cheap Listings</h3>
      {cheapListings.map((listing, i) => (
        <div key={i}>
          Name: {listing.data.name} --- URL: {listing.data.listing_url}
        </div>
      ))}
    </>
  );
}

export default App;
この code により、先ほど query した listing と、$10 以下のすべての AirBnB の list が表示されます。
次のステップ
この guide の完了後、Squid が提供するその他の feature を自由に explore してください。MongoDB integration では、data の mutationも実行できます。さらに、authenticationを setup して、data の specific part に access できる user を control できます。